TidBITS#1192/23-Sep-2013
Apple has released the much-anticipated iOS 7, and you can learn all about it in another giant-sized issue of TidBITS! If you want to sync your iOS 7 device to your Mac, you’ll need iTunes 11.1, which also includes Apple’s new iTunes Radio service. Tonya Engst helps you make the transition and walks you through iOS 7’s main features, after which Josh Centers shares seven additional top tips. Jeff Carlson explains iOS 7’s new Camera and Photos apps, while Glenn Fleishman details Find My iPhone’s new anti-theft features. Steven Aquino looks at visual accessibility in iOS 7, and Michael Cohen examines the future promise of iBeacons, the coolest iOS 7 feature you probably haven’t heard of. In our latest installment of FunBITS, Josh shows you how to get the most out of iTunes Radio, and in a small departure from iOS 7 news, we look at how Amazon has enabled AirPlay in its Amazon Instant Video iOS app, at last bringing the service to the Apple TV. With developers avoiding competition with Apple’s iOS 7 and iPhone news, the only notable Mac software release this week is Apple Configurator 1.4.
iTunes 11.1 Adds iOS 7 Compatibility and iTunes Radio
Apple has released iTunes 11.1 with some major new features. Most importantly, this release offers compatibility with iOS 7, and you’ll need iTunes 11.1 to sync an iOS 7 device with your Mac (so don’t upgrade to iOS 7 right away if you’re unwilling to move to iTunes 11.1 as well). To get the update, which is a 215 MB download, you can use the App Store app or go directly to the iTunes download page.
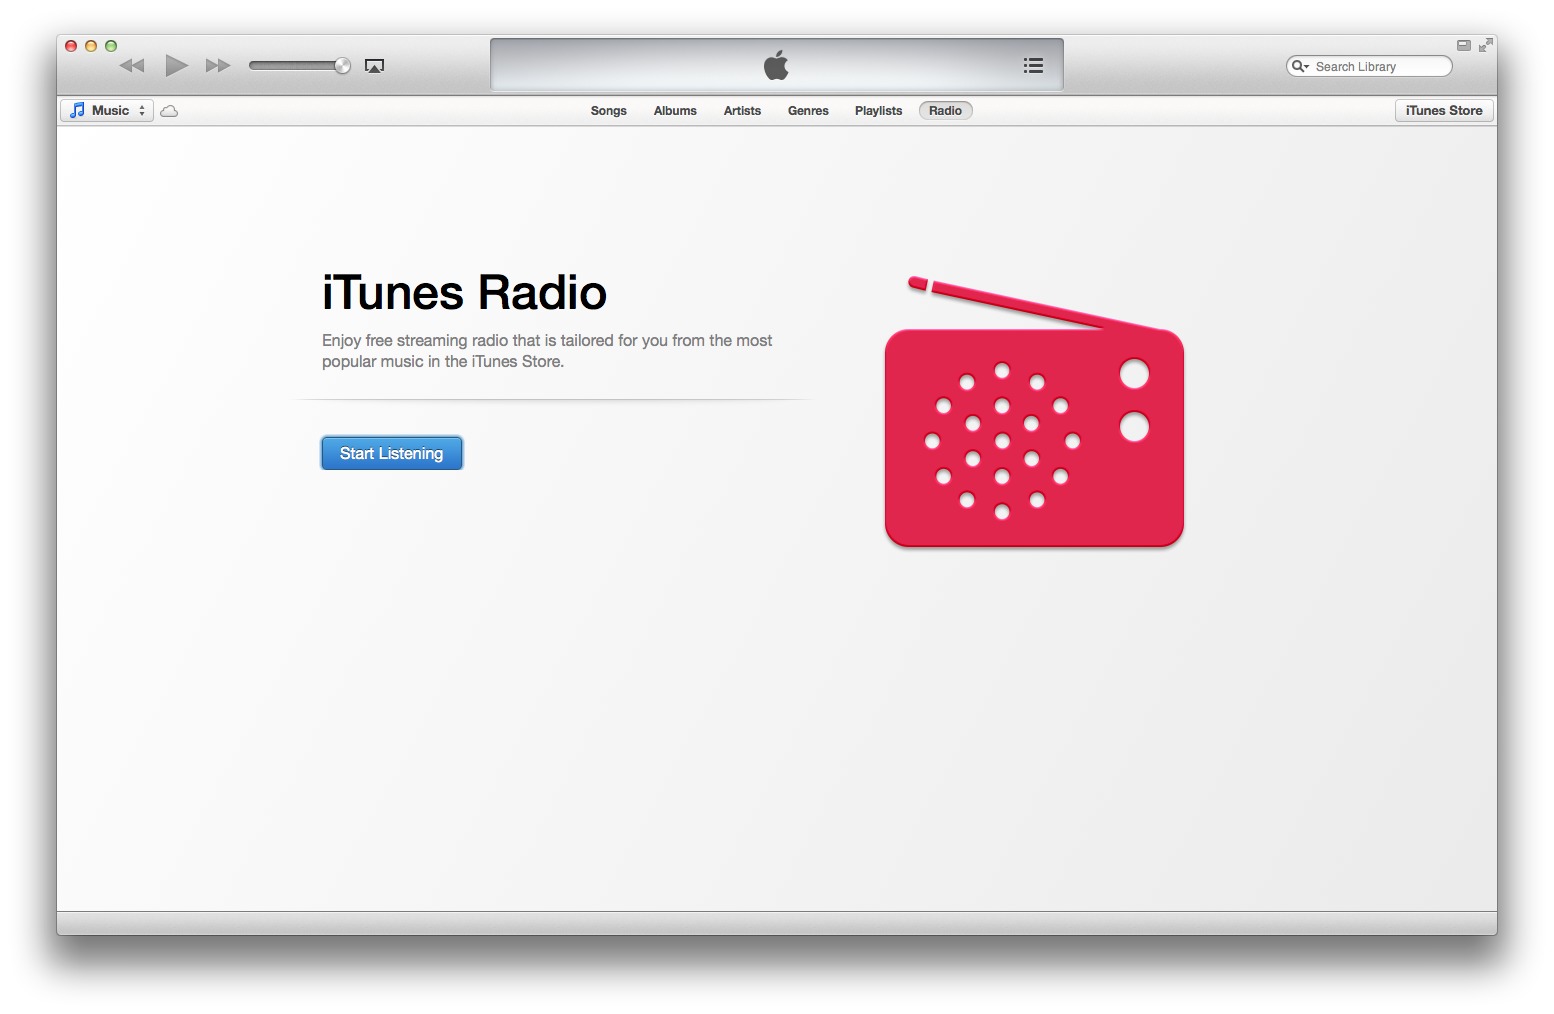
However, the marquee feature is iTunes Radio, Apple’s new free streaming music service. To access it, select Radio near the top of the screen while in your music library. For in-depth coverage, see “FunBITS: Tune into iTunes Radio,” 18 September 2013.
Another major new feature is Genius Shuffle, which plays a series of random, yet related tracks. To try it out, choose Controls > Genius Shuffle, press Option-Space on the keyboard, or Option-click the Genius Shuffle button, located on the left side of the player controls where the Last Track button would normally be.

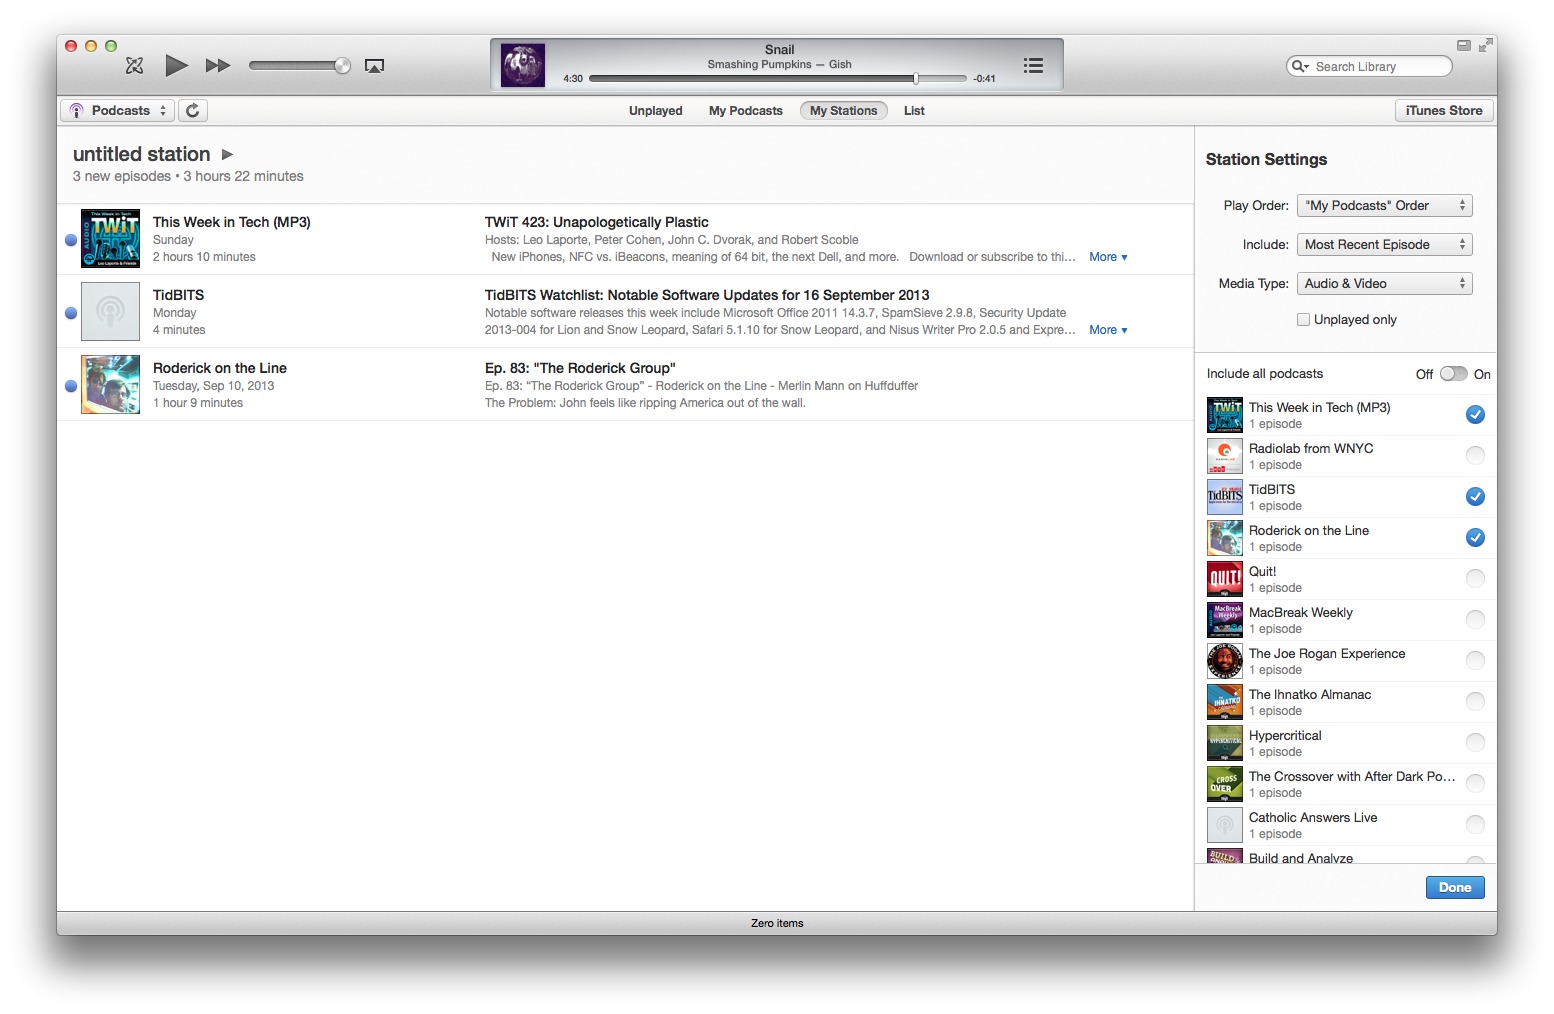
Good news for podcast fans: iTunes 11.1 finally syncs podcasts wirelessly over iCloud with Apple’s Podcasts app for iOS (which doesn’t appear to be updated for iOS 7 yet). However, in my testing, sync seems hit or miss. Also new is the My Stations feature, which lets you create smart playlists for your podcasts and sync them with the iOS app.
Amazon Instant Video Comes to Apple TV via AirPlay
Amazon has finally added AirPlay support to its Amazon Instant Video app for iOS. Now, you can use AirPlay with an Apple TV connected to your big-screen TV to display digital videos from Amazon. That includes videos purchased or rented, as well as content from Prime Instant Video, which is a Netflix-like service included with $79-per-year Amazon Prime memberships. Note that Prime Instant Video is available only for the primary Amazon Prime account, not for any secondary accounts that might share the free shipping service.
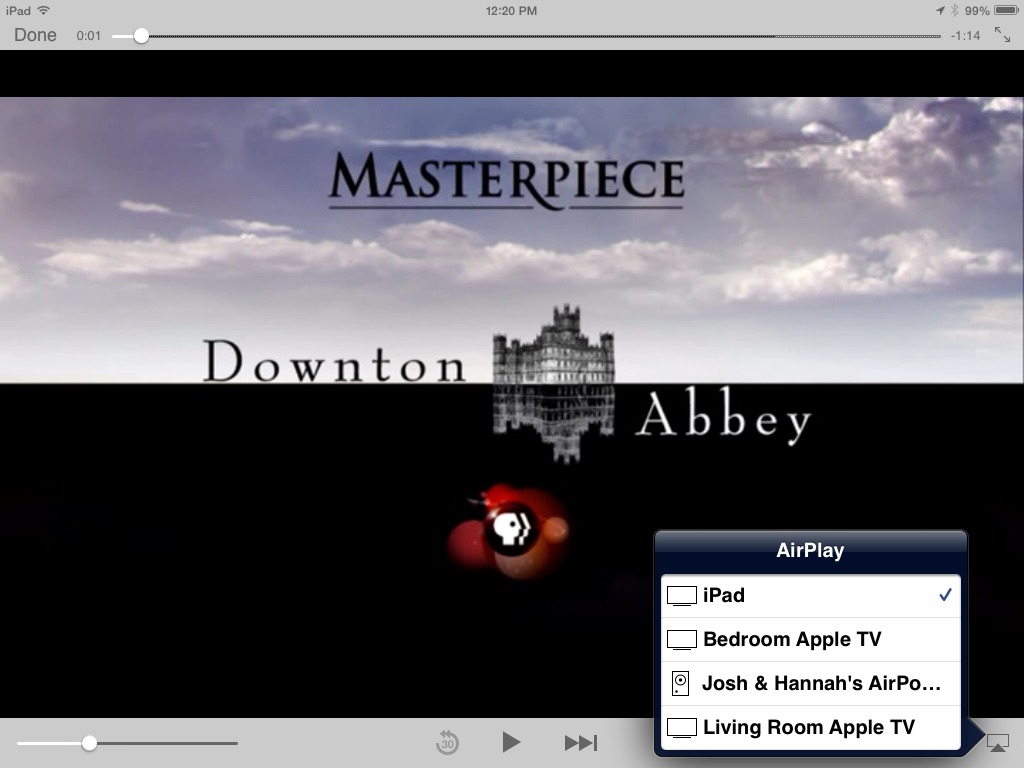
This is good news for Apple TV fans, as Amazon Prime’s video service has been snatching a number of exclusives away from Netflix, including Under the Dome, Downton Abbey, Grimm, Justified, Falling Skies, The Good Wife, and Workaholics. Parents will especially be pleased, as Amazon has a number of children’s shows that have vanished from Netflix, including Yo Gabba Gabba, SpongeBob SquarePants, Dora the Explorer, and Blue’s Clues.
But don’t get too excited just yet, as there are some drawbacks to the Amazon Instant Video app. The first, of course, is that you can’t purchase content from within the app itself, thanks to Apple’s restrictions. However, any digital videos you’ve purchased from Amazon’s Web site should appear in the cloud tab, where you can either stream them or download them to your device for offline viewing. Having both options is an improvement over iTunes, which perplexingly requires downloads and doesn’t offer video streaming in iOS 6 (iTunes video streaming has been added to iOS 7), and Netflix, which offers only streaming and not offline viewing.
The Amazon Instant Video app’s other major liability is that you can’t lock your device or do anything else while streaming a video with AirPlay. If you do, the video shuts off, which is supremely annoying. However, the device will not auto lock while playing a video. Also, in my testing, the video quality wasn’t as good as Netflix.
However, despite these problems, Amazon Instant Video has long been missed on the Apple TV, and while using AirPlay via the iOS app isn’t as seamless as an Apple TV app would be, it’s better than we had before.
iOS 7 Pre-flight Checklist
With iOS 7 freshly installed on your iPad, iPhone, or iPod touch, it’s time to verify that essential settings are configured properly and that you are up to speed on the most important changes. Work through this pre-flight checklist to ready yourself for your first few days with iOS 7. I’ll point out items that have moved in iOS 7 and talk about a few gee-whiz, sexy features later, but first, let’s take care of the two essentials: Lock screen security and signing in to important accounts and services.
Get Centered — In iOS 7, besides the camera, two control screens can be opened from the Lock screen: the new Control Center and the iOS 7 version of Notification Center. Because a passcode is not required to open those screens, you should make sure that you are cool with those items being available to anyone who picks up your device. If you aren’t, you can remove them from the Lock screen via the Settings app.
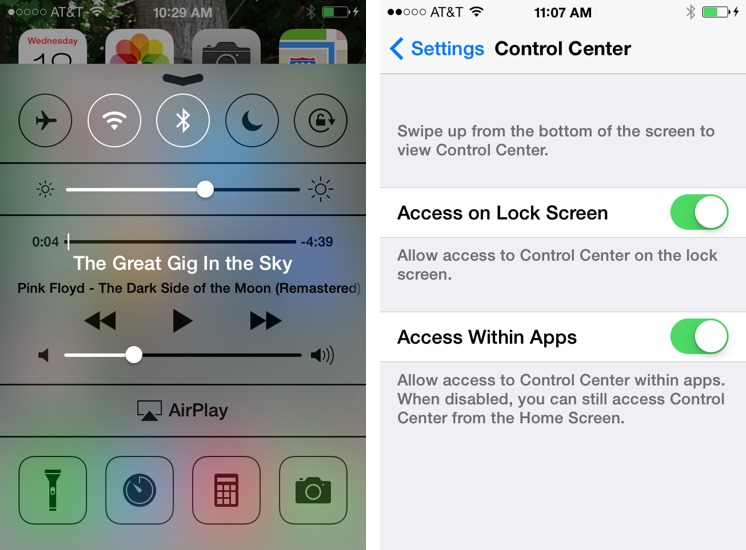
Indicated by a subtle dash-like lozenge at the bottom of the Lock screen, Control Center slides up from the bottom of the screen in response to a swipe up (if you have trouble with this gesture, start with your finger literally off the bottom of the screen). Experienced iOS users should find Control Center’s icon-driven features self-explanatory, including switches for Airplane Mode and Do Not Disturb, AirPlay options, and (on some models) a flashlight button. These controls seem generally innocuous, but if you want to keep a toddler from playing with them, for example, shut off that option in Settings > Control Center. And if you’re not a fan of Control Center in general, perhaps because it pops up while you’re while playing a
game, you can disable it within apps as well.
To avoid accidentally toggling an option in the top row of Control Center (such as Bluetooth), get in the habit of closing Control Center by swiping down from above it on the screen, or just tapping above it.
Access to Notification Center from the Lock screen isn’t new, but when you swipe down from the top of the screen, you now have access to three categories of what’s-up data. The Today view helpfully combines key notification types, like the weather forecast and your morning agenda, and it can even mention if you’ve double-booked your schedule. The All view shows, well, all your notifications, and the Missed view is great for catching up on a pile of previous notifications. Tap Settings > Notification Center for lots of fine-grained control over Notification Center, both on the Lock screen and off. If, for example, you love that Notification Center can show calendar events but don’t want those to appear via the Lock screen, you
can shut that off. Tap Settings > Notification Center and then work with the options for Calendar.

More Lock Screen Options — To tweak a few additional Lock screen behaviors, visit Settings > General > Passcode Lock, and consider the switches under Allow Access When Locked; the image below shows the options on my iPhone; different devices have slightly different choices. While you’re on the Passcode Lock screen, if you aren’t happy with the complexity or frequency of your Lock screen passcode, now is a good time to adjust it. (And, if you are lucky owner of a new iPhone 5s, with a passcode set up, you can turn on the Fingerprints feature.)
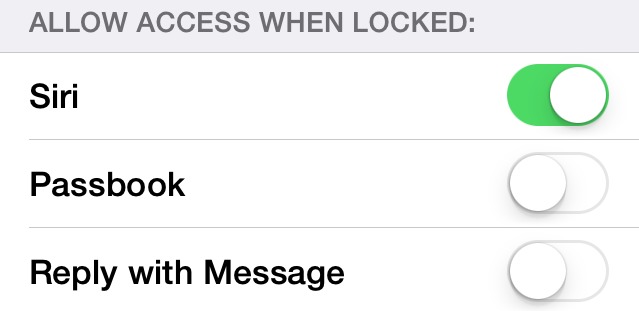
In case you’re wondering, the Camera app is always available on the Lock screen, so you can’t prevent someone from taking photos.
ID Your Apple ID — In Settings > iCloud and in Settings > iTunes & App Store, check your iCloud and iTunes logins to make sure you are signed in with the accounts that you want to use — many people have ended up with multiple Apple IDs, and it’s easy to end up with your accounts in a muddle.
While you are on the iCloud screen, make sure all the switches for individual iCloud services are set the way you want them. In particular, I strongly recommend turning on Find My iPhone, partly because it can be handy for finding a misplaced device, but more because it now renders the device useless to a thief by requiring your Apple ID to erase or restore it (see “iOS 7 Locks Stolen iPhones to Prevent Resale,” 18 September 2013).
Although you probably won’t see it immediately after iOS 7’s launch, keep an eye out for an iCloud Keychain switch. iCloud Keychain is designed to securely store and share your Web login credentials and credit card information between Safari in iOS and Safari on a Mac running OS X 10.9 Mavericks.
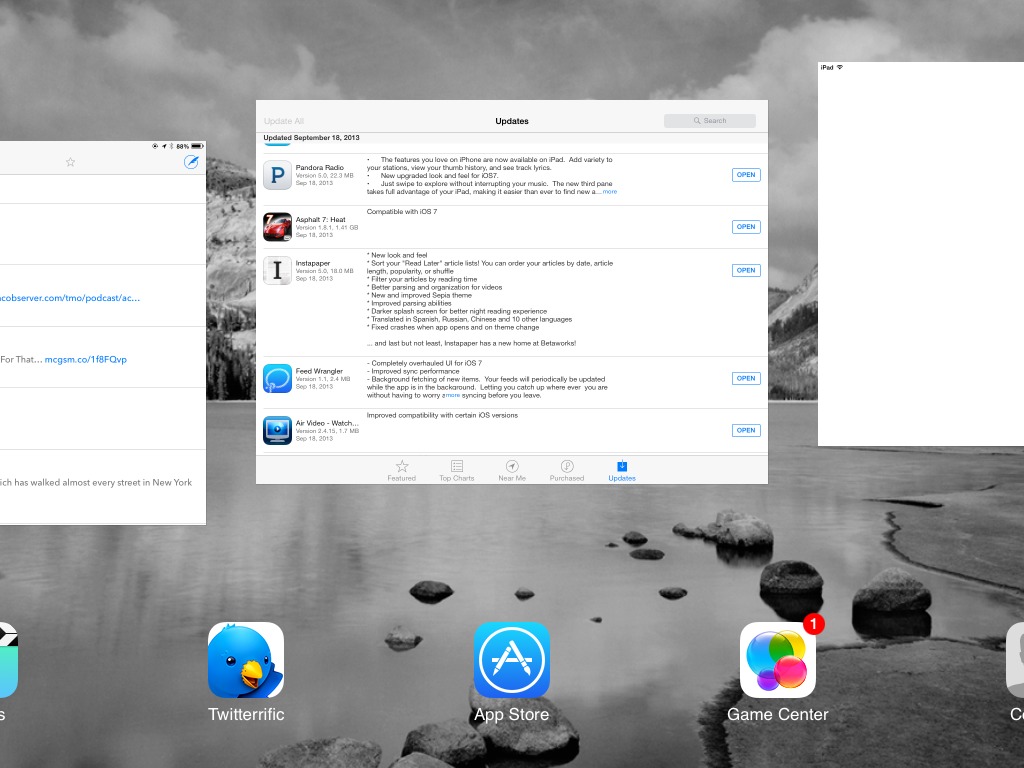
While you’re on the iTunes & App Store screen, look in the Automatic Downloads section and confirm the settings for downloading new content. In particular, pay attention to the new Updates switch in that list. If it’s on, new versions of apps will automagically download without your having to remember to retrieve them via the App Store app. However, this makes it more difficult for you to learn about what’s new in an update, or decide not to get it. A recent update to the Google Authenticator app, for instance, deleted users’ stored settings, and while Google pulled the update immediately and released another update that fixed the problem for affected users within a week, it still caused significant consternation for some
TidBITS readers. If you do enable any automatic downloading and you have a smallish data plan, take note of the Use Cellular Data switch; keep it off to make updates download only over Wi-Fi.
Check What Downloads over Cellular — In addition to limiting some iTunes Store downloads to Wi-Fi, as noted in the previous paragraph, you can keep data costs down by monitoring your usage and shutting off unwanted cellular activity. Visit Settings > Cellular and scroll down to access various options, including checking your usage details and shutting off cellular access for individual apps. At the bottom of the screen, note the System Services item, which reports on cellular usage for different background tasks in iOS 7, so you can tell if some background process has gone haywire. We haven’t seen any excessive data usage in iOS 7 betas, but we will be watching
carefully (“Mysterious iOS 6 Cellular Data Usage: A Deeper Look,” 24 October 2012).

More Credentials — If you’ve upgraded an existing iOS device to iOS 7, your various accounts are probably set up correctly, but it’s worth checking anyway, and it’s absolutely essential when setting up a new device! First, make sure you can access your usual networks and devices by verifying that you have an active Wi-Fi connection and that any Bluetooth devices you use are properly paired.
With that done, check the apps and services that you use regularly to ensure you are logged in, or can log in if you want to. Open Settings and scan the entire list (at the left on an iPad) for account-based options. Of course, there are the settings in Mail, Contacts, Calendars, but don’t forget about Game Center, Messages, Twitter, Facebook, and — new in iOS 7 — Flickr and Vimeo.
Now, go beyond what appears in Settings. Do you use Dropbox or some other file-syncing service? Make sure it’s working! Is your email arriving? Calendars updating? You know the drill.
Where’d It Go? — Your device is secure and your accounts are set up. Good! Now it’s time to get oriented, and learn which features have disappeared or moved in the switch from iOS 6 to 7:
- Search: You no longer search for apps, tunes, contacts, and other data by swiping the first page of the Home screen to the right, to display the Spotlight search page. Now, to access Spotlight, you swipe down from anywhere on the Home screen. Well, almost anywhere. Start too high up, and you’ll open Notification Center instead. Start too low, on the Dock, and nothing will happen. The options for customizing what types of data appear in search results (plus their order in the results) are still available in Settings > General > Spotlight Search.
-
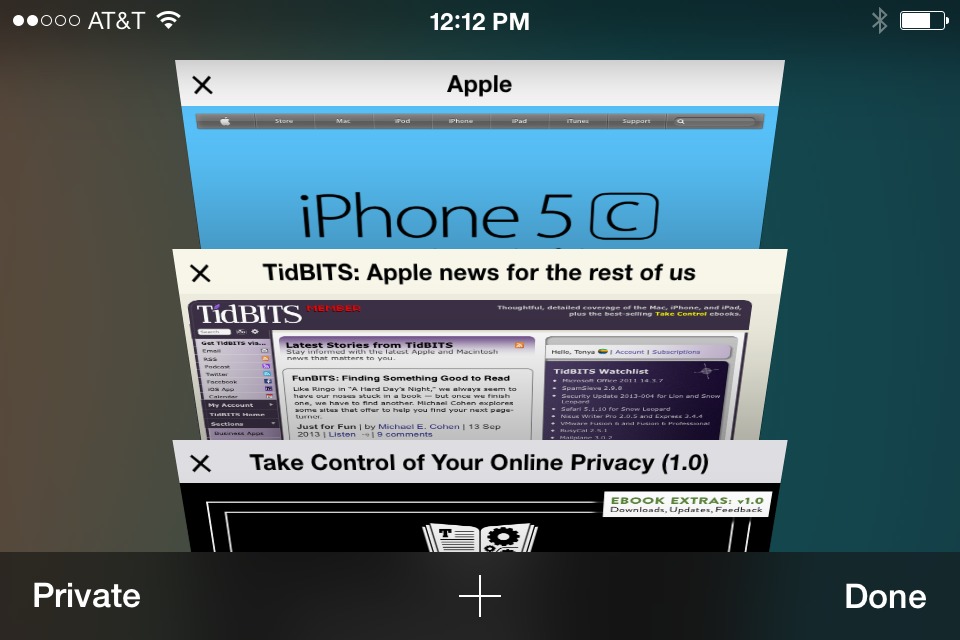
Quit an app: You might want to quit a misbehaving app, to get a fresh start. (Particularly until iOS 7 app updates arrive, it’s more likely you’ll see frozen apps.) As before, double-press the Home button to access the Multitasking bar. Unlike in iOS 6, you now drag up on a preview image — rather than pressing and holding the icon until it wiggles — for the app that you want to quit.
-
Playback controls on the Multitasking bar: Previously, you invoked the Multitasking bar and then swiped to the right to access playback controls. In iOS 7, these controls, including volume and AirPlay, live in Control Center, available by swiping up from the very bottom of any screen.
-
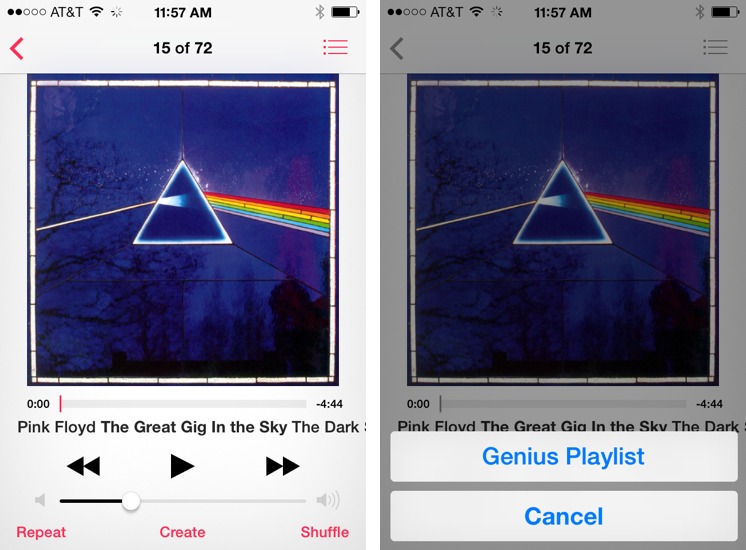
Start Genius in the Music app: Apple never can seem to get comfortable with the layout and interface in the Music app, and iOS 7 gave the company yet another chance to make adjustments. This time, in keeping with the look of iOS 7, Apple has done away with the inscrutable atom icon for creating a Genius playlist, which isn’t a bad thing. Now, to make a Genius list, first start playing your seed song and then tap the word Create at the bottom of the Now Playing screen; then in the menu that appears, tap Genius Playlist. Similarly, the enigmatic buttons for repeat and shuffle have been replaced by textual buttons; tap Repeat to choose from Repeat Off, Repeat Song, and Repeat All. When you tap Shuffle, it highlights and changes to
Shuffle All. -
Take a panorama in the Camera app: If your device previously supported Camera’s Panorama mode (iPhone 5, iPhone 4S, and the fifth-generation iPod touch), you may have become accustomed to tapping Options then Panorama before slowly sweeping your device across the view to take a super-wide shot. Forget about that, because in iOS 7, you swipe the textual control bar to switch to Pano and then tap the round, white shutter button. Tapping items on the mode control does not work — you must swipe, but you can also swipe anywhere on the image. (The new iPhone 5s and 5c also support Panorama mode, but Apple did not add the mode to any additional older devices.)
-
Siri Web searches: By default, Web searches in Siri now use Microsoft’s Bing and show the top results within the Siri screen, rather than dump you directly into Safari. Wikipedia and Twitter searches also report results within Siri. If you prefer Google’s results, which appear in Safari, just use Google as a verb, or say “Search Google for…” Alas, the Voice option in the Google Search app remains more accurate and far faster than Siri in iOS 7 (which, if it doesn’t improve from the iOS 7 betas, has gone downhill).
-
Share: The Share button has been around for a while. In its previous incarnation, it looked like a box with a swooshing arrow coming out of it. You tap it to access various sharing options, like putting a photo on Facebook or sending a PDF as an email attachment. It can also lead to a Print command. In iOS 7, the image is stripped down, retaining the arrow, but otherwise looking entirely different. You can see the iOS 6 and iOS 7 versions of the button below, on the bar found at the bottom of the Safari app, along with the similarly adjusted next/previous arrows and the bookmarks/history icon and tab icon.
-
Real-life visual metaphors: There’s a fancy word for this: skeuomorphism. The iOS 6 Calendar app, with its stitched-leather desktop blotter look, and Game Center’s green felt look are skeuomorphic, though not functionally so. The pre-iOS 7 Home screen app icons, which are shaded and shadowed to look like buttons you could press on a physical device, are also skeuomorphic, with their look giving a real-world clue as to how to use them. (For some thoughts about when skeuomorphism can be helpful, see “Ebooks, Footnotes, and Skeuomorphs, Oh My!,” 4 June 2013.)
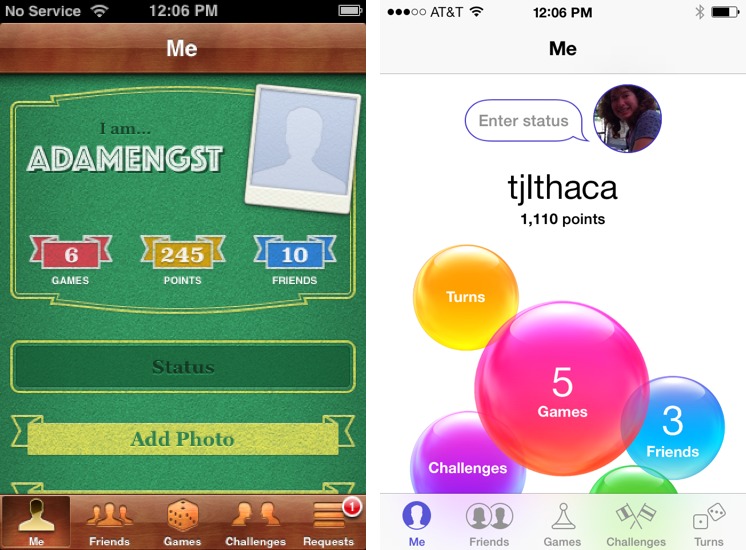
Skeuomorphism is largely gone in iOS 7, with the interface focusing on content, not on a representation of the world in the pre-electronic era. Most of the purely visual skeuomorphs won’t likely be missed — how many people have stitched-leather desk blotters today? — but you may long for some of the more functional skeuomorphs. In particular, it can be difficult in iOS 7 to know what to tap, since many buttons are now just words without outlines, and the flatness of the interface eliminates the use of visual
depth to indicate that controls move when tapped or swiped. If you’re confused, tap everything.


Must-know Features — It’s playtime! Let’s look at a handful of iOS 7 features that I can’t resist sharing. There are many more changes in iOS 7, but let’s focus on a few that are immediately useful, outrageously cool, or demo fodder:
- Dynamic Type: Apps that use iOS 7’s new Dynamic Type, such as Apple’s Contacts and Mail apps, can now show text in smaller or larger sizes, with typographic details like font weight and letter spacing adjusting appropriately, based on your slider setting in Settings > General >Text Size. To access even larger sizes, tap General > Accessibility > Larger Type, turn on the switch, and drag that slider to a larger size. (For more on iOS 7’s accessibility features, see “Peering at iOS 7 for the Vision Impaired,” 19 September 2013.) You can expect many more apps to support Dynamic Type in the future. The images below show the Contacts app with the smallest Text Size setting (left)
and the largest Large Type setting (right). -
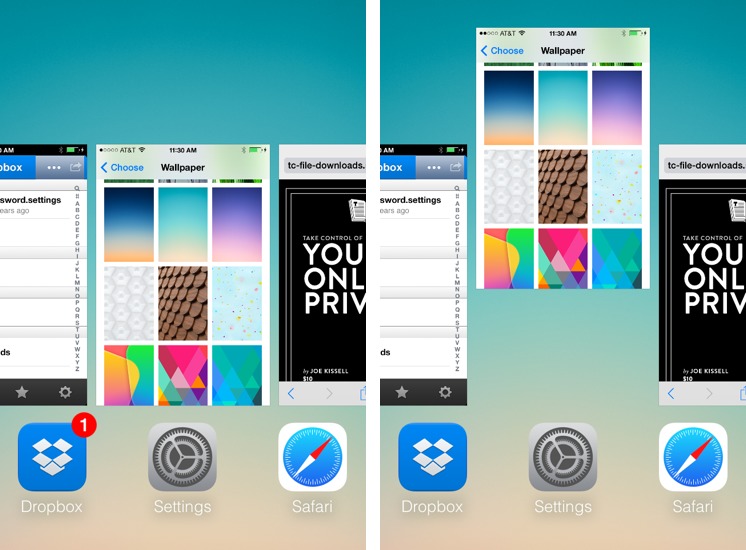
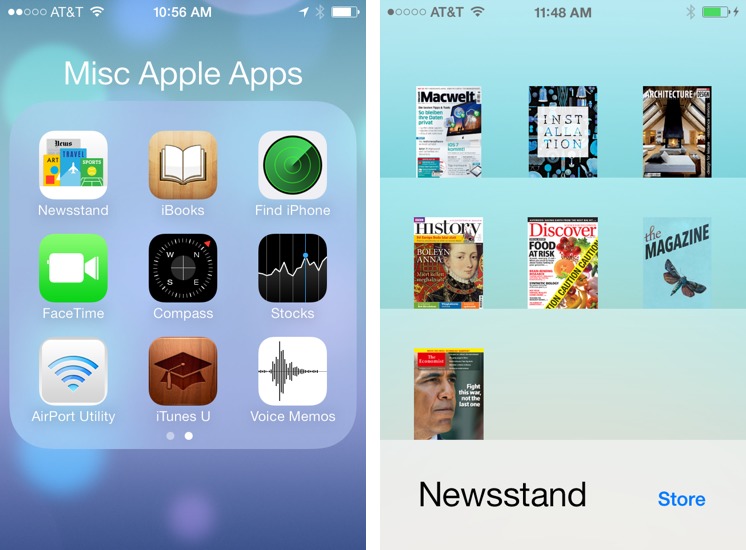
Home Screen folder changes: Folders can now have multiple screens and can hold an unlimited number of apps (up from a paltry 12!), giving you significantly more control over how you organize your Home screens. Plus, Apple’s Newsstand app, which is itself sort of a folder, can finally now be placed in another folder. You can see it at the upper left with its new iOS 7 icon in the image below; note how its wood-shelf look has been dropped in favor of entirely abstract “shelves.”
-
Parallax: A visual effect where a stationary object appears to move because of a change in the viewer’s location, parallax is now a daily experience in iOS 7. To experience parallax on the Home screen, tilt your device slowly back and forth while watching the app icons appear to move slightly over the wallpaper behind them. Trippy. (If you can’t see it well, switch to wallpaper that has fine detail, like a close-up of a leaf or photo of a person. Apple’s new dynamic wallpapers, which move slightly in the background, don’t work well for demoing parallax. Visit Settings > Wallpapers & Brightness to configure your wallpaper.)
Another place to see parallax is in Safari’s new Tab view. On the iPhone, tap the tab button at the lower right to view your tabs (or add a tab by tapping the + button). Once you have a few tabs loaded, tilt the device forward and back to see the effect.
-
FaceTime Audio: Having a bad hair day? To talk to someone on another iOS device running iOS 7 via FaceTime without seeing them or worrying about looking at the screen, there’s now FaceTime Audio, which you invoke by tapping a phone icon in the FaceTime section of someone’s contact info. Of course, you could use Skype, or Google Hangout, or place a normal phone call on the iPhone, but FaceTime Audio may become the default voice call service for those of us in the Apple ecosystem, especially once it’s supported in Messages in Mavericks. On the iPhone, FaceTime has also been split out into its own, separate app, though it’s still available in the Phone app.
-
Apps Near Me: At the bottom of the screen in the App Store app, tap Near Me to try this neat feature, and keep it in mind for the next time you are traveling, in a museum or on a hike, or anywhere where there might be an app that’s relevant to your specific location. I live in a spread-out suburban neighborhood in Ithaca, with plenty of pastures and a lot of woods, about 5 miles from Cornell University. Tapping that icon in my home office showed me three apps, two for local publications (the Ithaca Journal and the Cornell Daily Sun), plus a transit app from my county’s bus service. On a visit to the nearby Ithaca airport, a fourth app, for Cornell Dining, joined the offerings.
-
AirDrop: This technology has been in OS X for bit, enabling quick Mac-to-Mac file sharing using peer-to-peer Wi-Fi, in case options like file sharing, messaging, email, or Dropbox don’t work for you. (We’ve never run into a need for it.) In iOS 7, AirDrop appears as a new sharing option, so you can send contacts, notes, Safari links, photos, map locations, and more to another nearby iOS device. Alas, of the currently released iOS devices, AirDrop works only with the iPhone 5, 5c, and 5s; fourth-generation iPad and iPad mini; and the fifth-generation iPod touch. You can enable it from within Control Center.


With the above list of notable features soaked into your brain, you’re good to go with iOS 7. But, although this article is a great start and enough to help you maintain your geek cred the first time you show off iOS 7 to a friend, it’s far from a complete tour of what’s new in iOS 7. Despite passionate lobbying from others on the TidBITS staff, I’ve not said anything about iBeacons (“The Promise of iBeacons in iOS 7,” 18 September 2013), most changes in Safari, call blocking, new Siri commands, and much more. Look to additional TidBITS articles for more about iOS 7 and how you can put it to good use.
Seven Top Tips for iOS 7
You’ve installed iOS 7, updated your apps, and played with the big new features (if not, be sure to check out Tonya Engst’s “iOS 7 Pre-flight Checklist,” 18 September 2013). But here are seven top tips — culled from the massive set of tiny changes in iOS 7 — that you might have missed.
Post to Twitter and Facebook — You might have noticed that the buttons you could previously use for quick posts to Twitter and Facebook are absent from Notification Center in iOS 7. But there’s an easy workaround. Just tell Siri to “send a tweet” or “post to Facebook,” and it presents you with a text box into which you can type your message. Thanks to Steven Aquino for this one!

Multitask Your Multitasking — You know the fancy new multitasking view in iOS 7, the one you activate by pressing the Home button twice quickly? You might know you can close an app by swiping up on its preview, but did you know that you can use multiple fingers to quit up to three apps at once? Also, check out that parallax effect!
On the Level — While iPhone users find themselves needing the sort of directions Maps provides more than the directions provided by the Compass app, the redesigned Compass app in iOS 7 sports a handy new level feature. Just swipe to the second screen to access it, and tilt the iPhone in a variety of directions to see how it helps you determine various angles. If you need a relative level reading, you can tap the screen to zero out the level. Tap it again to return to absolute level readings.

When Did I Say That? — Previously, Messages didn’t show a timestamp for every single message. It still doesn’t by default, but if you slide a message to the left, it reveals a timestamp for every message sent and received. It shows the timestamp only while your finger is on the screen; as soon as you let go, it bounces back.

Talk Blocking — Wish you could block harassing or annoying phone or FaceTime calls, text messages, and iMessages? Now you can! Navigate to Settings > Messages > Blocked, or Settings > FaceTime > Blocked. Tap the contact you wish to block, and the people on your block list will have to settle for sending you email. You can remove a block by tapping Edit and then the Unblock button.

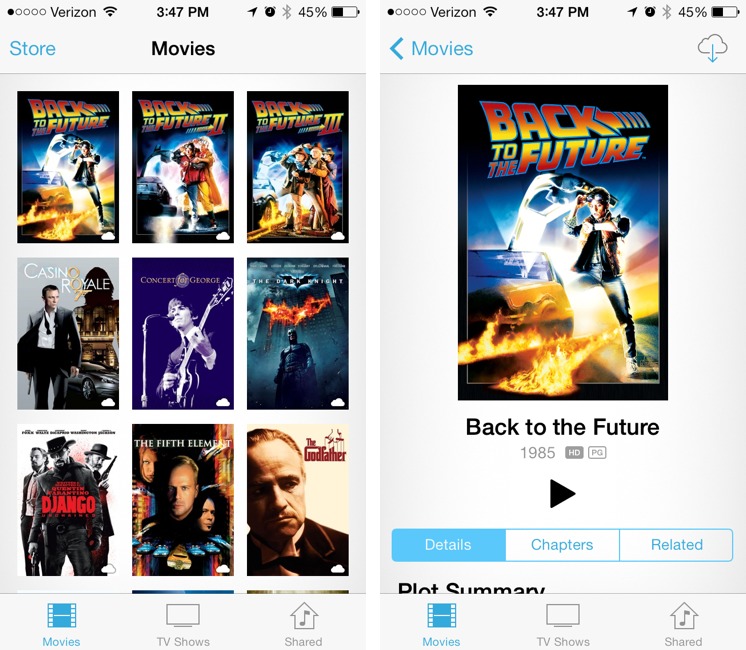
Stream Your Videos — You can finally stream your purchased iTunes movies and TV shows from the cloud instead of having to download them to your device. Just open the Videos app and they should all be there. Tap a title from the grid, then the play button to stream the video. You can still download videos for offline viewing if you want; tap the cloud icon in the upper-right corner.
At a friend’s house, and want to stream one of your movies without draining your iPhone’s battery dry? The Apple TV 6.0 update offers an AirPlay from iCloud option, which you can enable on the Apple TV under Settings > AirPlay. Now, when you AirPlay an iTunes video from your iPhone to the Apple TV, the Apple TV streams the video from iCloud instead of from your iPhone.
Filter the Web — There’s now a built-in Web content filter in iOS 7. To activate it, go to Settings > General > Restrictions. Tape Enable Restrictions, which prompts you to set a restrictions passcode. Then scroll down to Allowed Content and tap Websites. You can choose either to Limit Adult Content or to limit browsing to specific Web sites. The default whitelist includes the Apple home page, as well as a number of kid-friendly sites. Even if you choose the Limit Adult Content option, you can customize the list of Web sites.
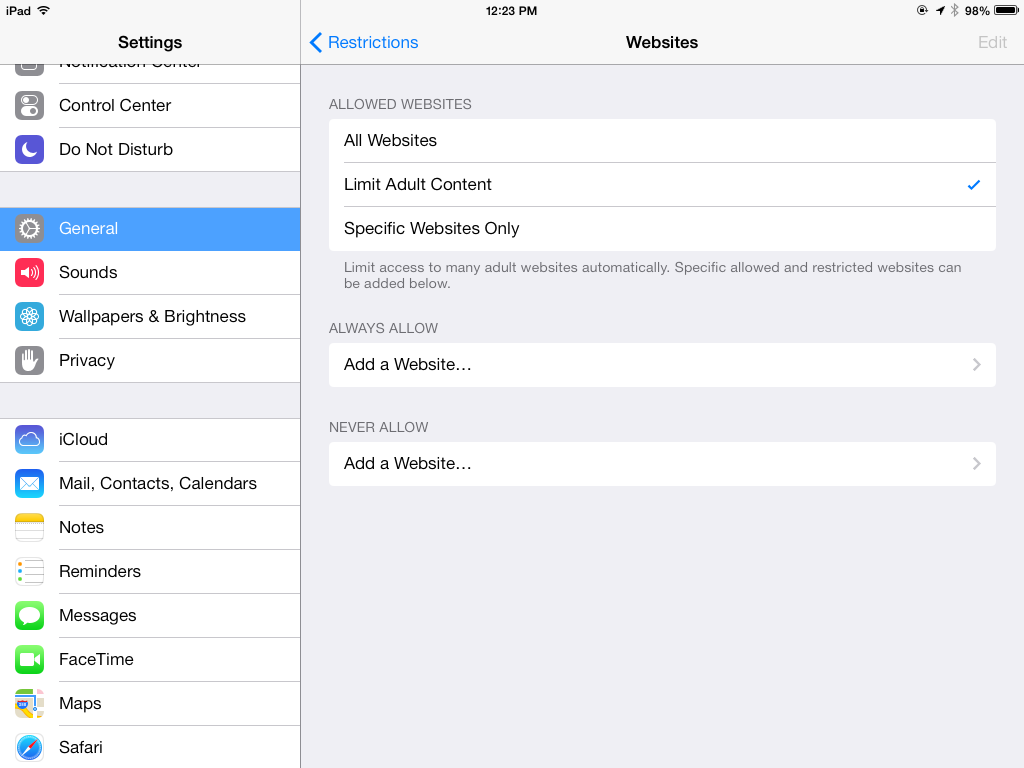
When you try to navigate to a verboten Web site, you’re politely informed you that it’s restricted, and given the opportunity to continue, if you enter your restrictions passcode. This works in Safari, but also in in-app browsers and third-party browsers like Chrome.

When the Web filter is enabled, you cannot turn on Private Browsing in Safari. However, Chrome can still create incognito tabs.
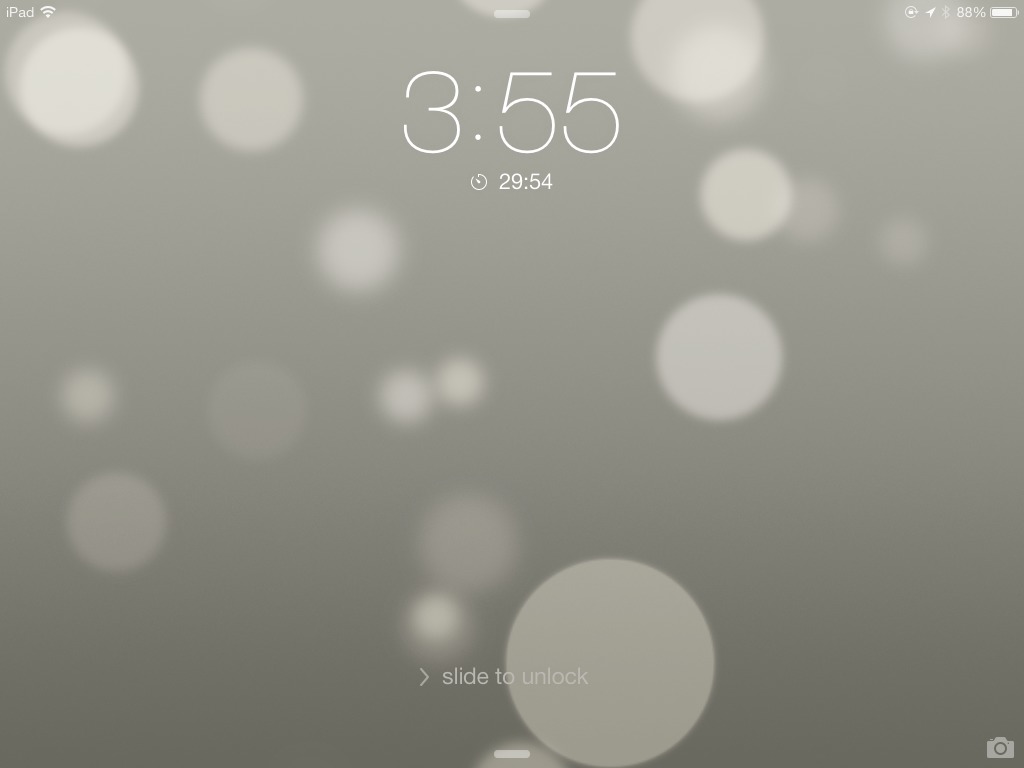
Bonus Tip: Timers in Lock Screen — We couldn’t resist just one more. If you use the Clock app’s timer function for cooking, there’s a useful little addition to iOS 7. The timer countdown appears in the Lock screen, so you can see how much time is left on your soufflé with a quick glance and tap to stop the timer alert without unlocking.
Is your top iOS 7 tip not here? Tell us about it in the comments!
Photos Get Renewed Focus in iOS 7
The market for low-end compact cameras is quickly drying up, replaced by the photo capabilities of smartphones such as the iPhone, the iPod touch, and even the iPad. Apple has invested heavily in camera hardware, evidenced not only by the physical components of the camera in the iPhone 5s, but in the way image handling is boosted by dedicated processor functions.
For iOS 7, Apple also focused on the software that handles the capture and viewing of photos, revamping both the included Camera and Photos apps. The camera controls look quite different, but it’s the Photos app that’s likely to cause the most disorientation initially.
A New Look for the Camera App — Although the Camera app looks different from its iOS 6 incarnation, the features you’re accustomed to are still there: photo capture, video capture, HDR (high dynamic range) mode, panorama capture, flash, and a toggle for switching between the front- and rear-facing cameras. (The specific features vary by model. I’m using my iPhone 4S and third-generation iPad as reference here, but will note differences with other models as appropriate.)

Switching modes seems awkward at first, requiring that you slide the mode names as if they’re mounted on an invisible wheel — you can’t just tap a name to activate it, which seems odd given Apple’s apparent desire to reduce analog visual cues in the operating system. There’s a better way, though: swipe the middle of the screen to change modes.
But Apple hasn’t just reshuffled the furniture. A new Square format crops the image so it doesn’t matter if you’re holding the device horizontally or vertically, and is no doubt a response to the aspect ratio used by the immensely popular Instagram service.
Apple has also added filters for applying effects to images. (Apple’s site says filters in the Camera app are available for the iPhone 5 and later and fifth-generation iPod touch and later, but I see them on my iPhone 4S. They’re not available in the Camera app on the iPad, but you will find them in the Photos app.)
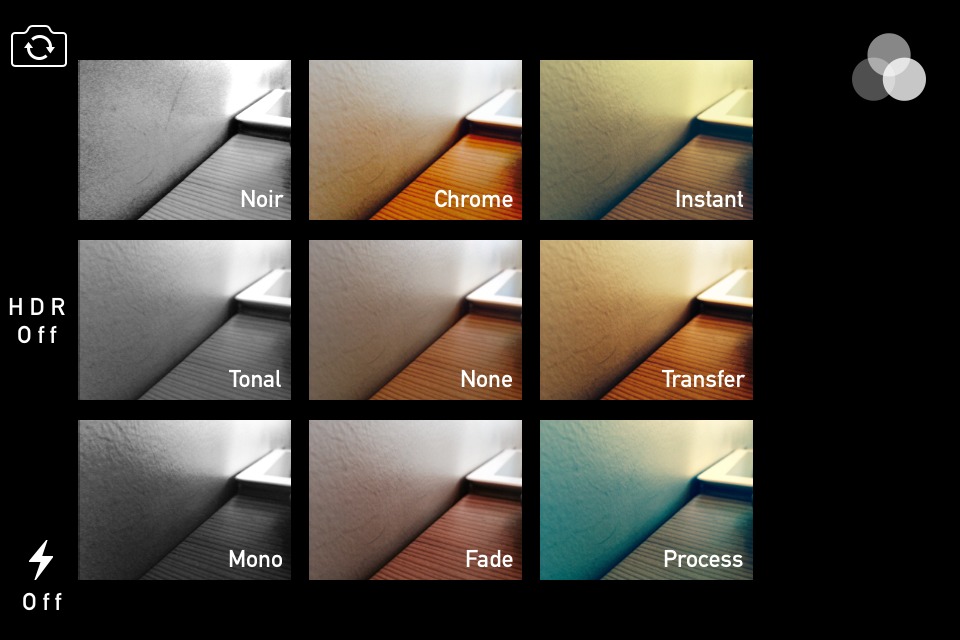
I’m not a huge fan of photo filters, but Apple has implemented them in a smart way. You can either apply the filter to an existing image, or, by tapping the overlapping circles, preview and apply the filter before you take the picture. If you change your mind later, you can switch to another filter in the Photos app or remove the filter and view the image as it was captured; the camera doesn’t hard-code the effect into the image. Also, the camera modes remember the last filter setting — you can leave Square
set to the Mono filter to always shoot in black-and-white, for example.
One welcome change is the capability to capture photos in bursts. The iPhone 5s is doubly impressive in that it can grab 10 shots per second. That performance didn’t trickle down to older models, but you get the same feature at a slower speed: pressing and holding the shutter button starts firing shots until you let go (at a little less than 2 shots per second on my iPhone 4S).
The new burst mode does remove one of my favorite features, though: under iOS 6 and earlier, you can press and hold the shutter button without taking a shot, giving you the opportunity to frame your shot and then simply slide your finger off the button to capture, thereby reducing the possibility of introducing camera shake by tapping the screen.
And here’s a small detail: The option to view a grid overlay is now enabled by default; you can turn if off in the Settings app under the Photos & Camera category.
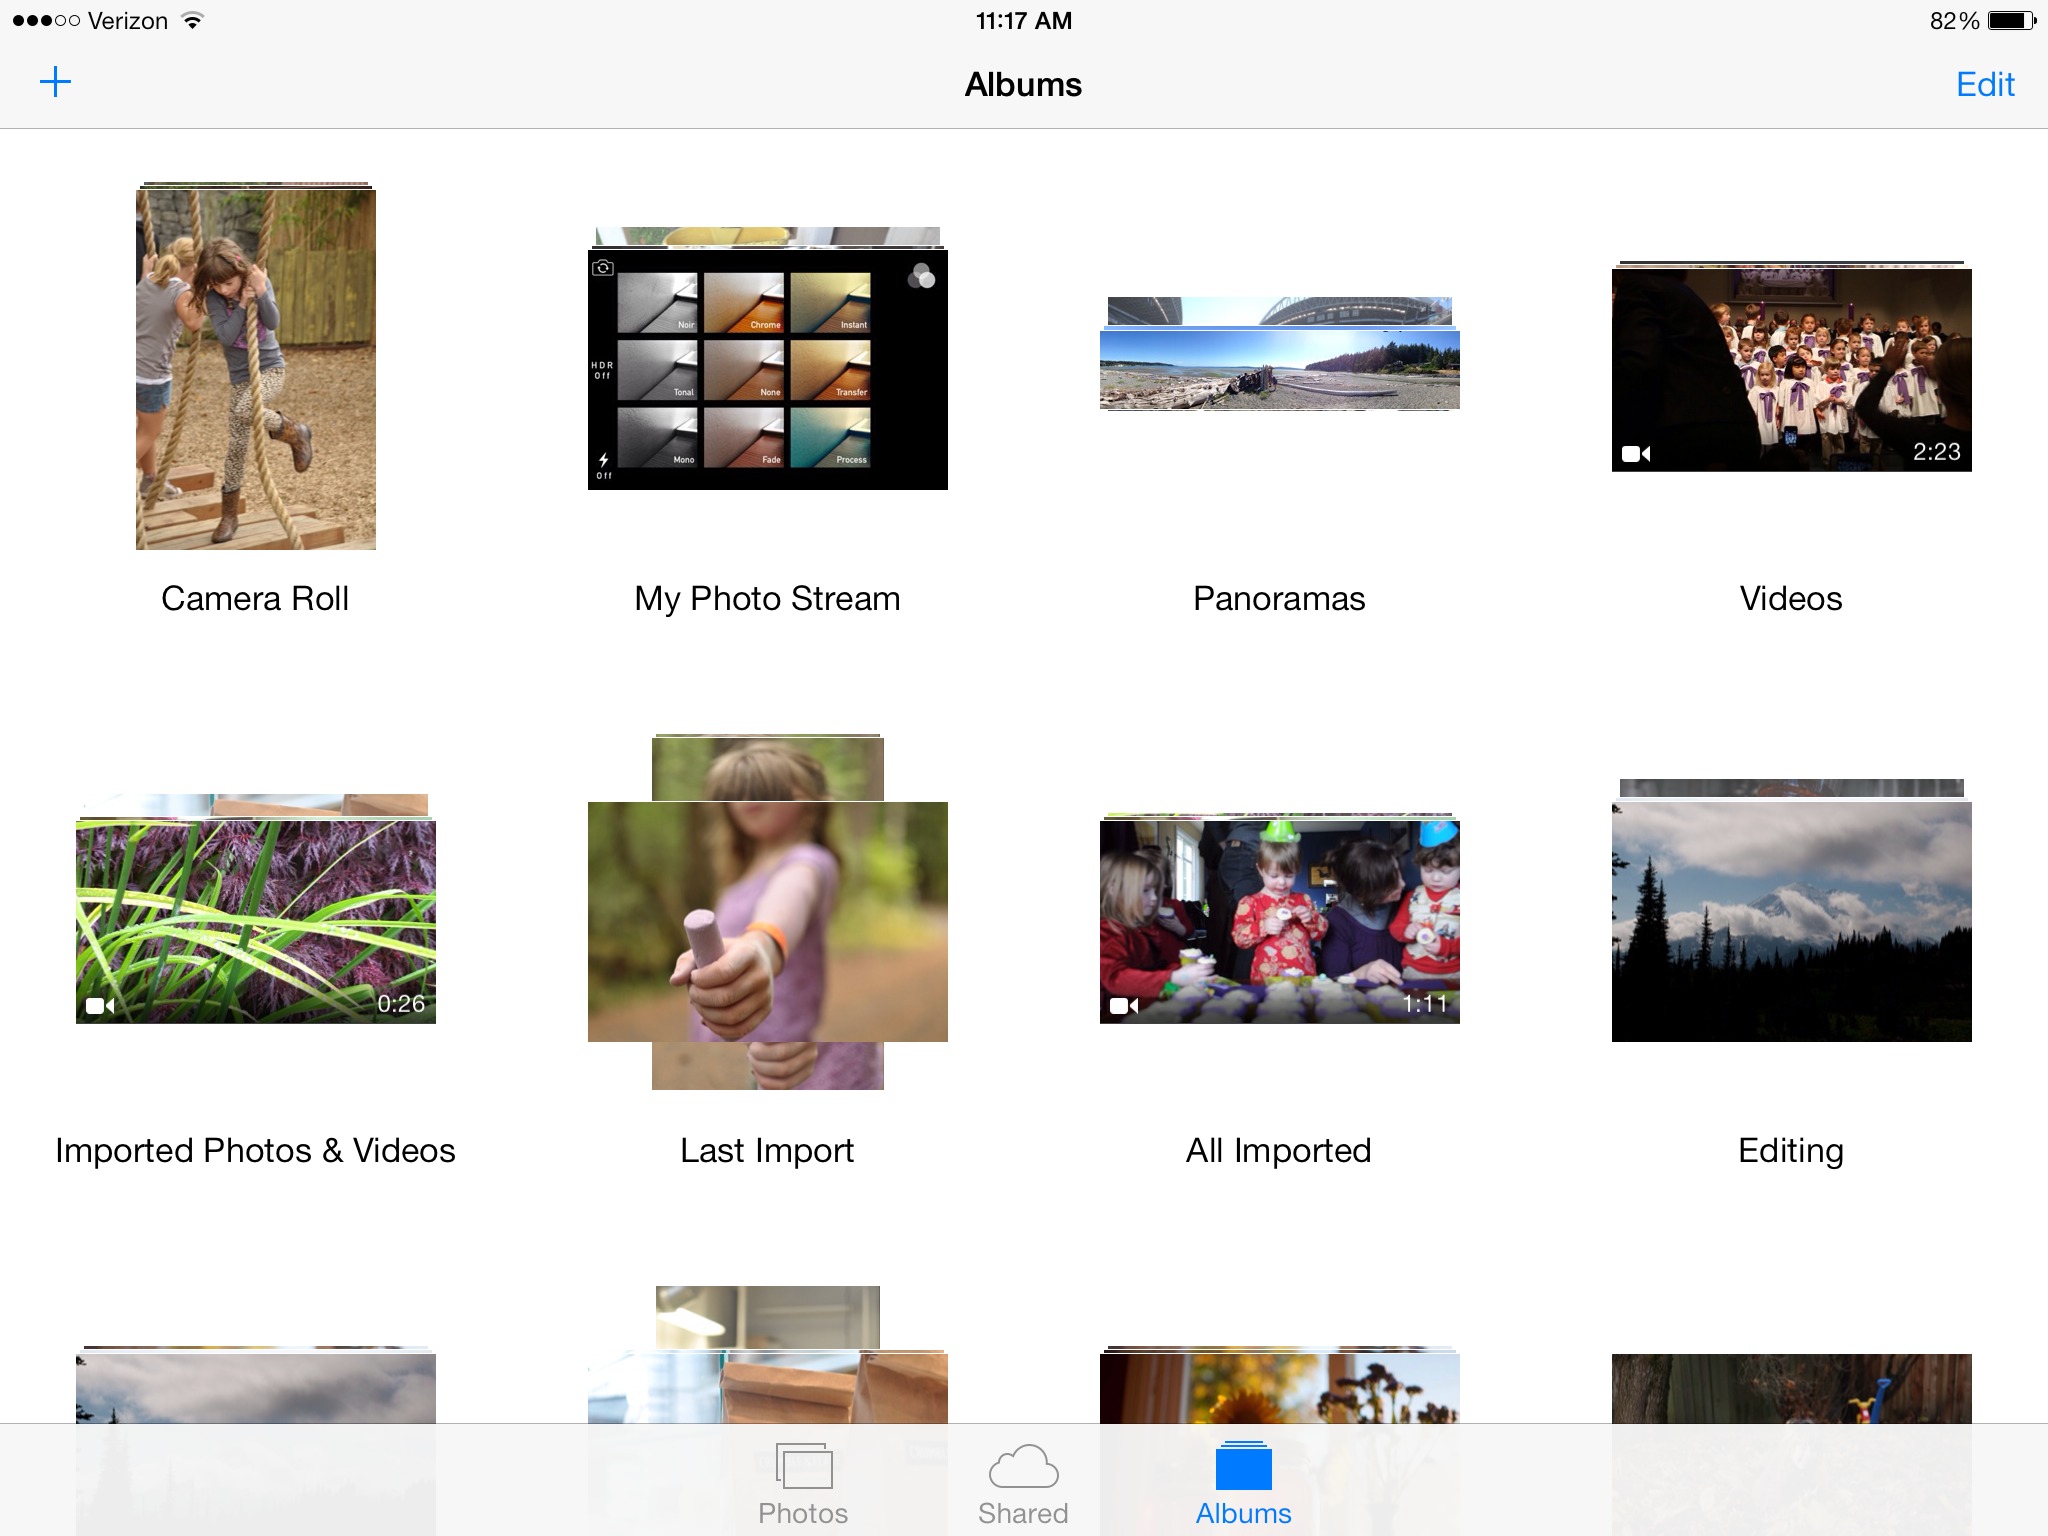
A New Approach for the Photos App — As with much of iOS 7, the core capabilities of the Camera app are still there, but revamped in appearance. The new Photos app, however, forces a new approach to how you browse and view your images.
To start with, the view is broken down into three sections: Photos, Shared, and Albums. I’ll get the latter out of the way since it’s the least changed. Any albums you’ve created on the device or synced from iTunes appear here, with the addition of a couple of auto-generated albums: panoramas you’ve shot appear in a new Panoramas album, and movies are collected into a new Videos album.
If you sync photos with iPhoto or Aperture and include the Faces feature, you’ll find a Faces album here as well. In iOS 6, Faces was its own top-level category. That applies to Events, too, synced from the computer.
The Photos category in iOS 6 was a catch-all for all photos on your device. Under iOS 7, Apple has instituted an organization scheme based on a combination of time and location, broken down into Years, Collections, and Moments.
At the top level is Years, which separates your photos based on years in what might just be the prettiest bit of modern art in the operating system. Every photo is represented with a tiny icon to give you a top-down view of your entire library (large libraries still require scrolling).

Drag your finger over the miniature thumbnails to view a slightly larger preview; when you let go, the app displays the last-touched photo full-screen.

Although it’s not immediately apparent, two things are going on in the Years view. The library is organized by date, but the app also lists the locations in which the photos appear. Tap the name (such as “California & Washington” in my example above) to view the photos on a map. This view replaces the top-level Places view in iOS 6.

Pinch outward on a thumbnail to zoom in on the map and reveal more precise locations. Tapping a photo group jumps out of the map and reveals all photos in that location. The map feature extends all the way down through the Photos hierarchy; you can tap a location name in any view to bring up the map.
Going back to the Years view, tapping an area zooms into the Collections view, which offers more detail broken out into location and date. If a series of photos does not include geolocation data, they’re labeled with the capture date; tapping the date doesn’t do anything (only labels followed by a gray greater-than sign (>) are active links). Here, too, you can drag on the thumbnails to view a slightly larger preview of each image.

Collections are made up of Moments, which you access by tapping a group of photos. The Moments view presents more-coherent thumbnails; tap one to view the photo full screen.

Initially the photo is partially obscured by the Photos app’s navigation at the top and bottom of the screen, but tapping once on the screen hides those bars.

Photo Sharing — The Photo Stream tab in iOS 6 has been replaced by the Shared view, which features a new Activity feature: Anything you’ve shared, or items added to shared iCloud Photo Streams by others, appear in a scrollable view. It’s a nice addition, and reinforces the goal of having people like and comment on photos.

Tapping the Streams link in the top-left corner takes you to all photo streams you’ve shared or subscribed to.
As for sharing new photos, the mechanism in iOS 7 is mostly the same as in iOS 6, but with a couple of differences. The capability to select photos to share is available only in the Moments view: tap the Select link and then tap to select individual photos you want to share. iOS 7 also adds a Share link for every moment. Tap the link and choose to either Share This Moment (all images in the group) or Share Some Photos (individual shots from the group). Either way, the app presents you with iOS 7’s new popover for sharing via Messages, Mail, iCloud, Facebook, or Flickr (plus options to copy or print the items).

A Brief Aside about Slideshows — An iPad or iPhone makes a great presentation device for photos, so naturally the Photos app includes the capability to play an impromptu slideshow. (On the iPad, a Slideshow button appears in the Albums view. On the iPhone, you must select a photo within an album, tap the Share button, and tap the Slideshow button.)
However, I wish you could see my face as I type this, because I’m incredulous. After seven revisions of the operating system, the Slideshow feature is still hobbled by the fact that it can play only one song. You can opt to play music during the slideshow, but when you select the music from your iTunes library, you get to pick one song.
Look, I understand that playing slideshows with music probably isn’t an activity that people are clamoring for. But if you have a slideshow longer than a few minutes, the music feature makes no sense.
The Photos app slideshow feature has become my white whale, I’ll admit it. It’s the element I turn to with each release to gauge whether Apple is really paying attention to details. And for six years I can’t help wonder: What else are they overlooking? Well, besides some sort of library synchronization between iPhoto/Aperture and iOS devices so you could do some level of organization and editing away from your Mac. One major reason I say nothing about iOS devices in “Take Control of Your Digital Photos on a Mac” is because there’s no good way to work on your photo library on an iOS device.
Editing Photos — The built-in editing features haven’t changed much from iOS 6, and that’s fine. Apple offers iPhoto (now free when you purchase a new iOS device; see “iWork, iPhoto, and iMovie Free with New iOS Devices,” 10 September 2013), which is a great photo editor.
For basic editing, the Photos app lets you rotate, crop, fix red-eye, and enhance (automatically adjust tone and color) an image. New in iOS 7 are filters, which, as I mentioned earlier, are notable for being able to restore a photo’s original look even if you shot the image originally with a filter applied.
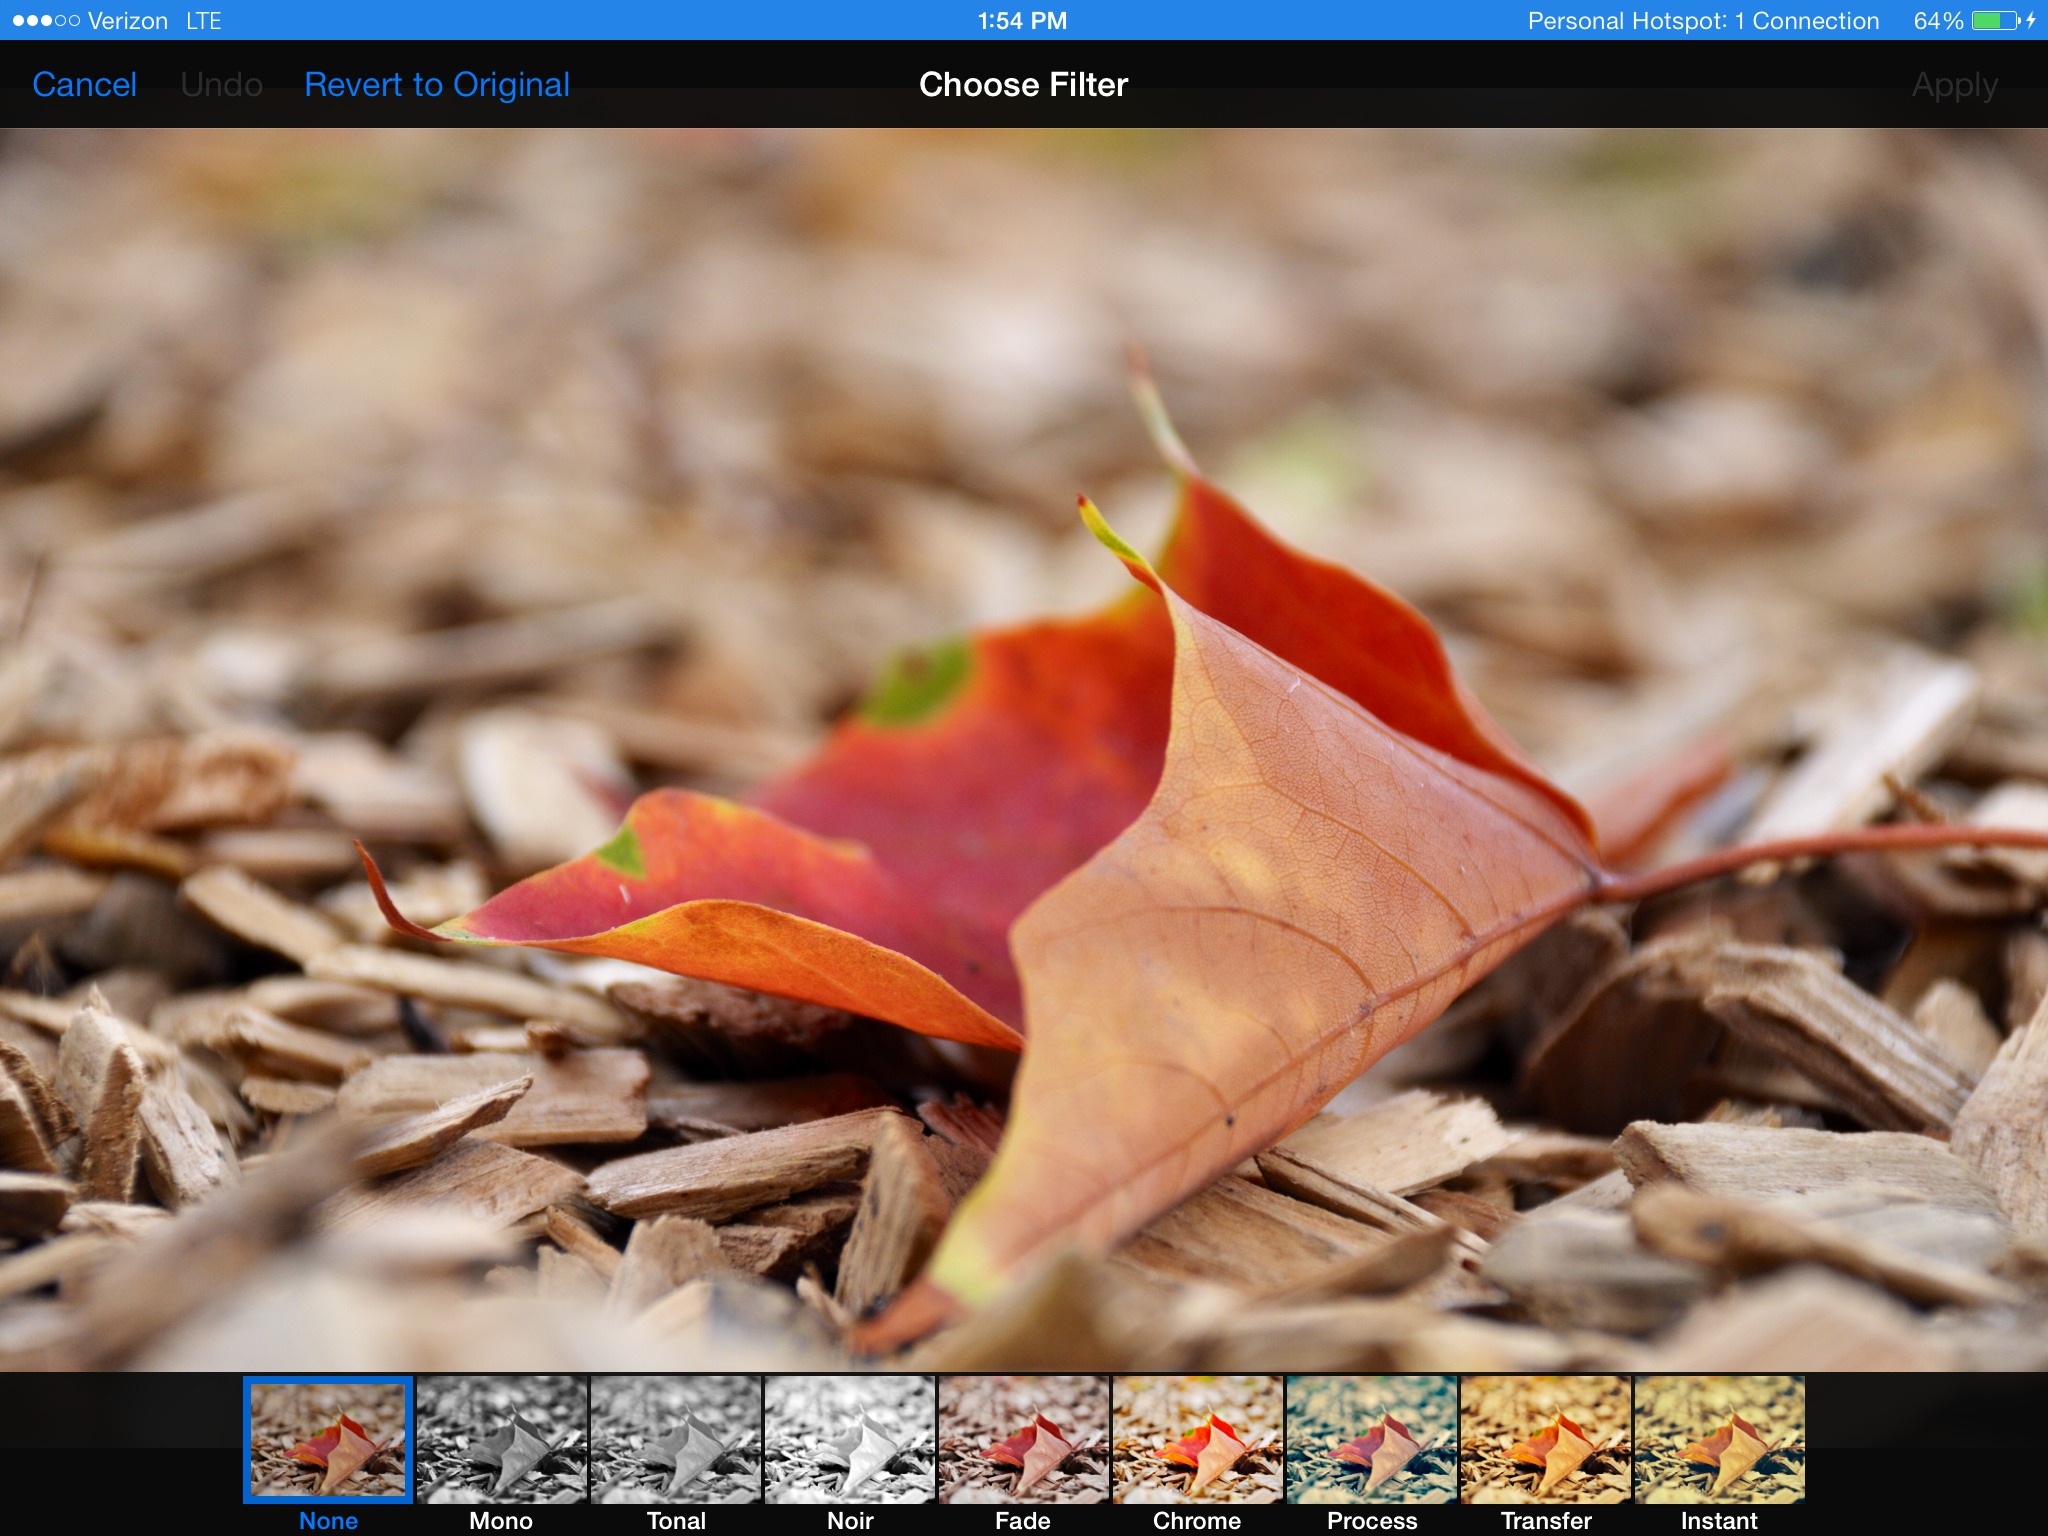
Photo Focused — The changes to the Camera app and the Photos app are designed to better anticipate how you browse images, and I think for the most part they’re successful. Instead of feeling regimented into different corners of the app, iOS 7 encourages you to dive into your library to pluck out the images you want. And, following the iOS 7 aesthetic, everything is clean, letting your photos (rightly) demand your attention instead of the app and its interface. Despite this, I’m sure the change will be disorienting at first for some people. As with the rest of iOS 7, though, it’s worth being patient and getting used to the new approach (not the least because nothing
you can do will change it).
iOS 7 Locks Stolen iPhones to Prevent Resale
In the June 2013 announcement of iOS 7, Apple emphasized changes in the Find My iPhone app and service. With good reason: the new version makes any iOS device far less attractive to steal, erase, and resell, plus it provides more location-tracking data. These improvements should reduce thieves’ interest in iOS devices because they won’t be easy to sell or fence, and might help law enforcement track down less-wary criminals more often.
Apple added this feature because mobile carriers (at least in the United States and several other countries) have shown little interest in helping their customers recover stolen mobile phones or eliminate the value of those phones at resale. Both GSM and CDMA phones have unique, burned-in hardware identifiers — the IMEI and MEID, respectively — and carriers know which ID is associated with your account. If you report a phone as stolen, the carrier could prevent that ID from being reactivated, provide you with information about its location, notify law enforcement, seize it when brought into a store, and so forth. Carriers do essentially none of that.
As a result, expensive smartphones with high resale value, like the iPhone, have become desirable targets for thieves, and account for a significant percentage of serious crimes in many cities. For instance, cellphone-related thefts accounted for 41 percent of serious crimes for six months earlier this year in San Francisco, 40 percent of robberies in Washington, D.C., and over 50 percent of all street crime in New York City.
With iOS 7 and Find My iPhone, Apple now has the technology to stop iOS device theft in its tracks, although the company couches these capabilities in terms of “lost” iPhones, not stolen ones. No one wants to think about theft, but we all misplace things.
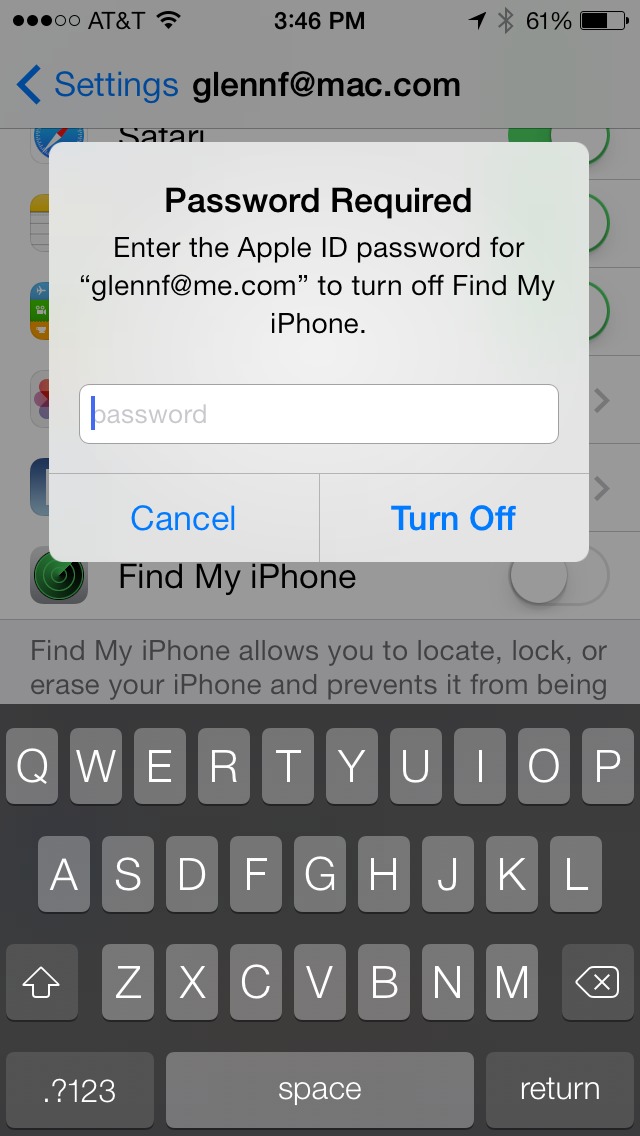
Enabling Find My iPhone is easy, and isn’t really any different than in previous versions of iOS. All that’s necessary is a free iCloud account. When you configure that account in the Settings app, you can turn on Find My iPhone with a single tap. What’s new is that, once Find My iPhone is turned on, you must enter the Apple ID password for that iCloud account to disable the service. Up to this point, savvy thieves knew to disable Find My iPhone on an unlocked iOS device immediately to prevent tracking — that will no longer be possible.
Of course, a thief could still power down the device, put it into a metal-lined box, or wrap it in aluminum foil to prevent it from broadcasting its location. But all that requires more preparation, and if it doesn’t happen immediately, the device could be reporting its location and optionally displaying recovery messages as soon as the owner marks it as lost via the iCloud Web site or the Find My iPhone app on another iOS device. That’s the first strike against crime.
The second — and most important — strike is that the device cannot be erased without entering the owner’s Apple ID password, preventing a thief from resetting a stolen iPhone to factory defaults before reselling it. Of course, if your iPhone lacks a passcode, it would still be somewhat usable, which isn’t ideal, but as long as it can reach a network, it continues to update its location. And, of course, you can opt to wipe it remotely. Even if the iPhone was off when the erase feature was invoked, the iPhone erases itself the instant it establishes any sort of network connection. Since the iPhone 3GS, a hardware encryption chip immediately destroys the iPhone’s contents by discarding the encryption key necessary to decrypt
data. Once that happens, the data is gone, and can’t be recovered via forensic tools.
The third and final strike is that, even after the device is wiped remotely, the recovery messages still appear and the owner’s Apple ID and corresponding password are required to restore it to working order. So even if you wipe your iPhone remotely, you don’t have to worry about anyone else ever being able to use it again. If it’s later recovered, you can easily restore from your most recent backup, entering your Apple ID and password when prompted.
In short, if you have Find My iPhone turned on in iOS 7, your Apple ID and password are required to:
- Turn off Find My iPhone
- Erase the iPhone
- Restore or set up the iPhone
(If you want to sell or give your iOS device away, disable the activation lock by going to Settings > General > Reset > Erase All Content and Settings.)
There’s a final piece to the puzzle for which we don’t yet have the answer: does Find My iPhone continue to transmit the device’s location after it has been erased? Up through iOS 6, it does not. But since iOS 7 clearly must have a network connection in order to confirm the entry of an Apple ID and password, it could in theory continue to send location updates.
There’s a precedent, too. In Mac OS X 10.7 Lion, Apple replaced the directory-based FileVault with FileVault 2, which encrypts the entire disk. (iPhone models with encryption chips use essentially the same system.)
Lion also includes Recovery HD, a hidden partition that one can boot into in order to run Disk Utility, or even reinstall Mac OS X. When FileVault 2 is enabled, Recovery HD (since 10.7.2, and also in all versions of 10.8 Mountain Lion) adds a Guest User login, as long as the Mac’s owner had previously logged into iCloud.
That Guest User login is useful, because it boots into Recovery HD and allows a network connection and access to Safari. But it’s also a honeypot. If a thief were to abscond with your MacBook Pro, log in via Guest User, and connect to a network, Find My Mac would be able to report its location back to you, assuming you had marked the Mac as lost.
Even if a Mac marked as lost is simply powered up, if it’s near a Wi-Fi network to which it has previously connected, Mac OS X associates itself and starts transmitting location information. (I explained this more fully at Macworld in “Can FileVault 2 and Find My Mac foil thieves?”)
Apple may be employing the same minor subterfuge here. Allowing a thief to power up a stolen iPhone and try to enter Apple ID passwords gives the device time to phone home. Will this lead the police to more recoveries? Hard to say. But it very well might help Good Samaritans to return misplaced iPhones, since you can now wipe a lost iPhone and still have a recovery message displayed!
Of course, just adding these features to iOS 7 won’t immediately turn an iPhone into technologia non grata. Thieves will still see them as quick returns on criminal investment for some time. But once word of the pointlessness of trying to resell a useless iPhone spreads among the intermediaries through whom stolen goods are fenced, we hope to see a significant drop in such thefts — and their associated intimidation and violence.
In the end, this subtle update to Find My iPhone may be the most important reason to upgrade to iOS 7. In fact, police officers in New York City are encouraging citizens to upgrade to iOS 7 for this very reason.
Peering at iOS 7 for the Vision Impaired
Over the years, Apple has shown a strong commitment to accessibility in iOS, improving on it with each major version of the operating system. This year is no different, as iOS 7 adds accessibility options — such as Dynamic Text and Increase Contrast — that are sure to be appreciated by users who rely on such capabilities to interact with their iOS devices. Being legally blind, I appreciate them, so follow along as I share the most noteworthy of iOS 7’s vision-related features.
Dynamic Type — One of iOS 7’s marquee features is Dynamic Type, which enables you to resize text, at least in apps that support it. To change the text size, go to Settings > General > Text Size and adjust the slider to your liking. It may take some time before most non-Apple apps support Dynamic Text, but a few apps have jumped on board early, such as the latest version of the Digg newsreader.

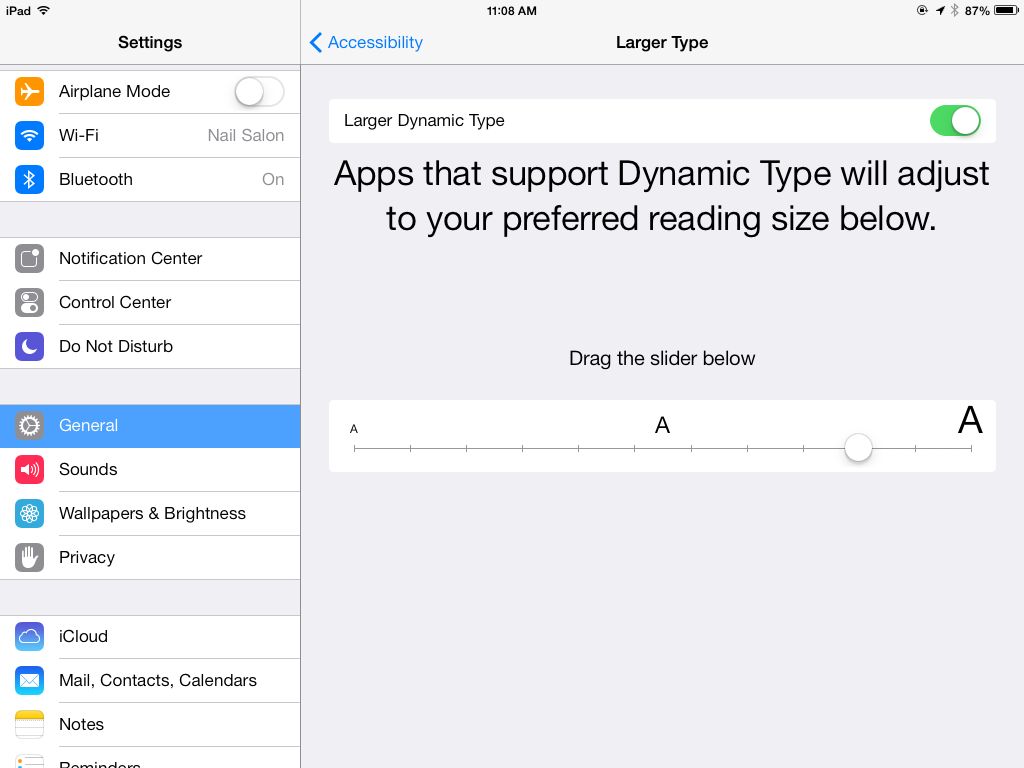
If you need even larger text, iOS 7 has you covered, with Larger Dynamic Type, a reworking of the Large Text feature in iOS 6. As its name implies, Larger Dynamic Type lets users adjust font sizes beyond what’s allowed in the Dynamic Type setting. To enable it, go to Settings > General > Accessibility > Larger Type, flip the switch, and drag the slider until you’re happy with the text size.
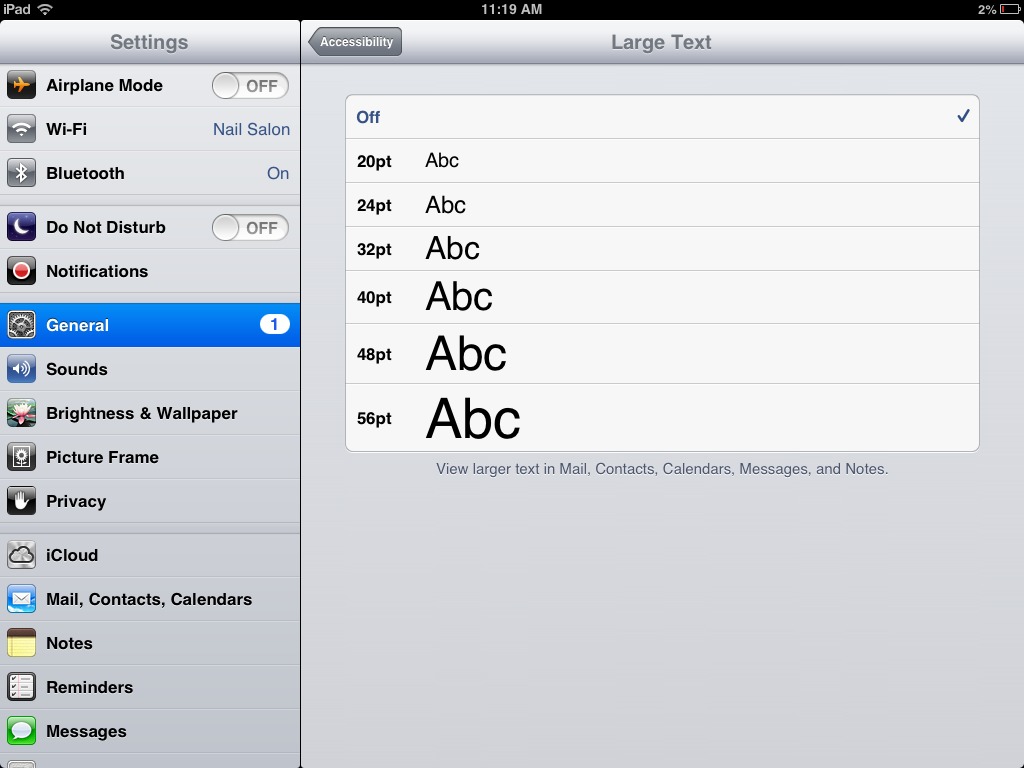
While I appreciate Larger Dynamic Text, I prefer the iOS 6 interface for setting it. In that version, Large Text presented users with size options ranging from 20 point (where I like it) all the way up to 56 point, with graphics illustrating the change in size. The explicitness of the point sizes and the pictures of the corresponding letters made it easier for me to gauge my settings. In iOS 7, Apple has done away with the numerical size ranges. It took me longer to measure the slider notches to find the setting I was most
comfortable with than it did with the old system. You wouldn’t think that an Accessibility option would become harder to use, but the new slider in iOS 7 is just that.
Despite this annoyance, one of the aspects of iOS 7 that I appreciate, accessibility-wise, is its redesigned typography. The new typography is so readable and the overall user interface so clean that I can use smaller text sizes, and still be comfortable enough to read without too much eye strain. I have the Larger Dynamic Text slider set just to the left of middle, and it works great. However, be sure to read the comments on this article, since others having more trouble.
Bold Text — iOS 7’s Bold Text feature is a one-trick pony: it makes all system-based text bold-faced. From texts to email messages to menu items, any text that is rendered by standard system calls becomes bold, although apps that use custom text rendering aren’t affected by it. I presume that Apple added this feature because text in iOS 7 is thinner and lighter than in iOS 6 (at least it got thicker during the beta period, or we would really have been in trouble).
To enable Bold Text, open Settings > General > Accessibility, and flip the Bold Text switch. You must then restart your device to finish enabling it, a strange and unwieldy requirement that’s entirely unlike Apple.
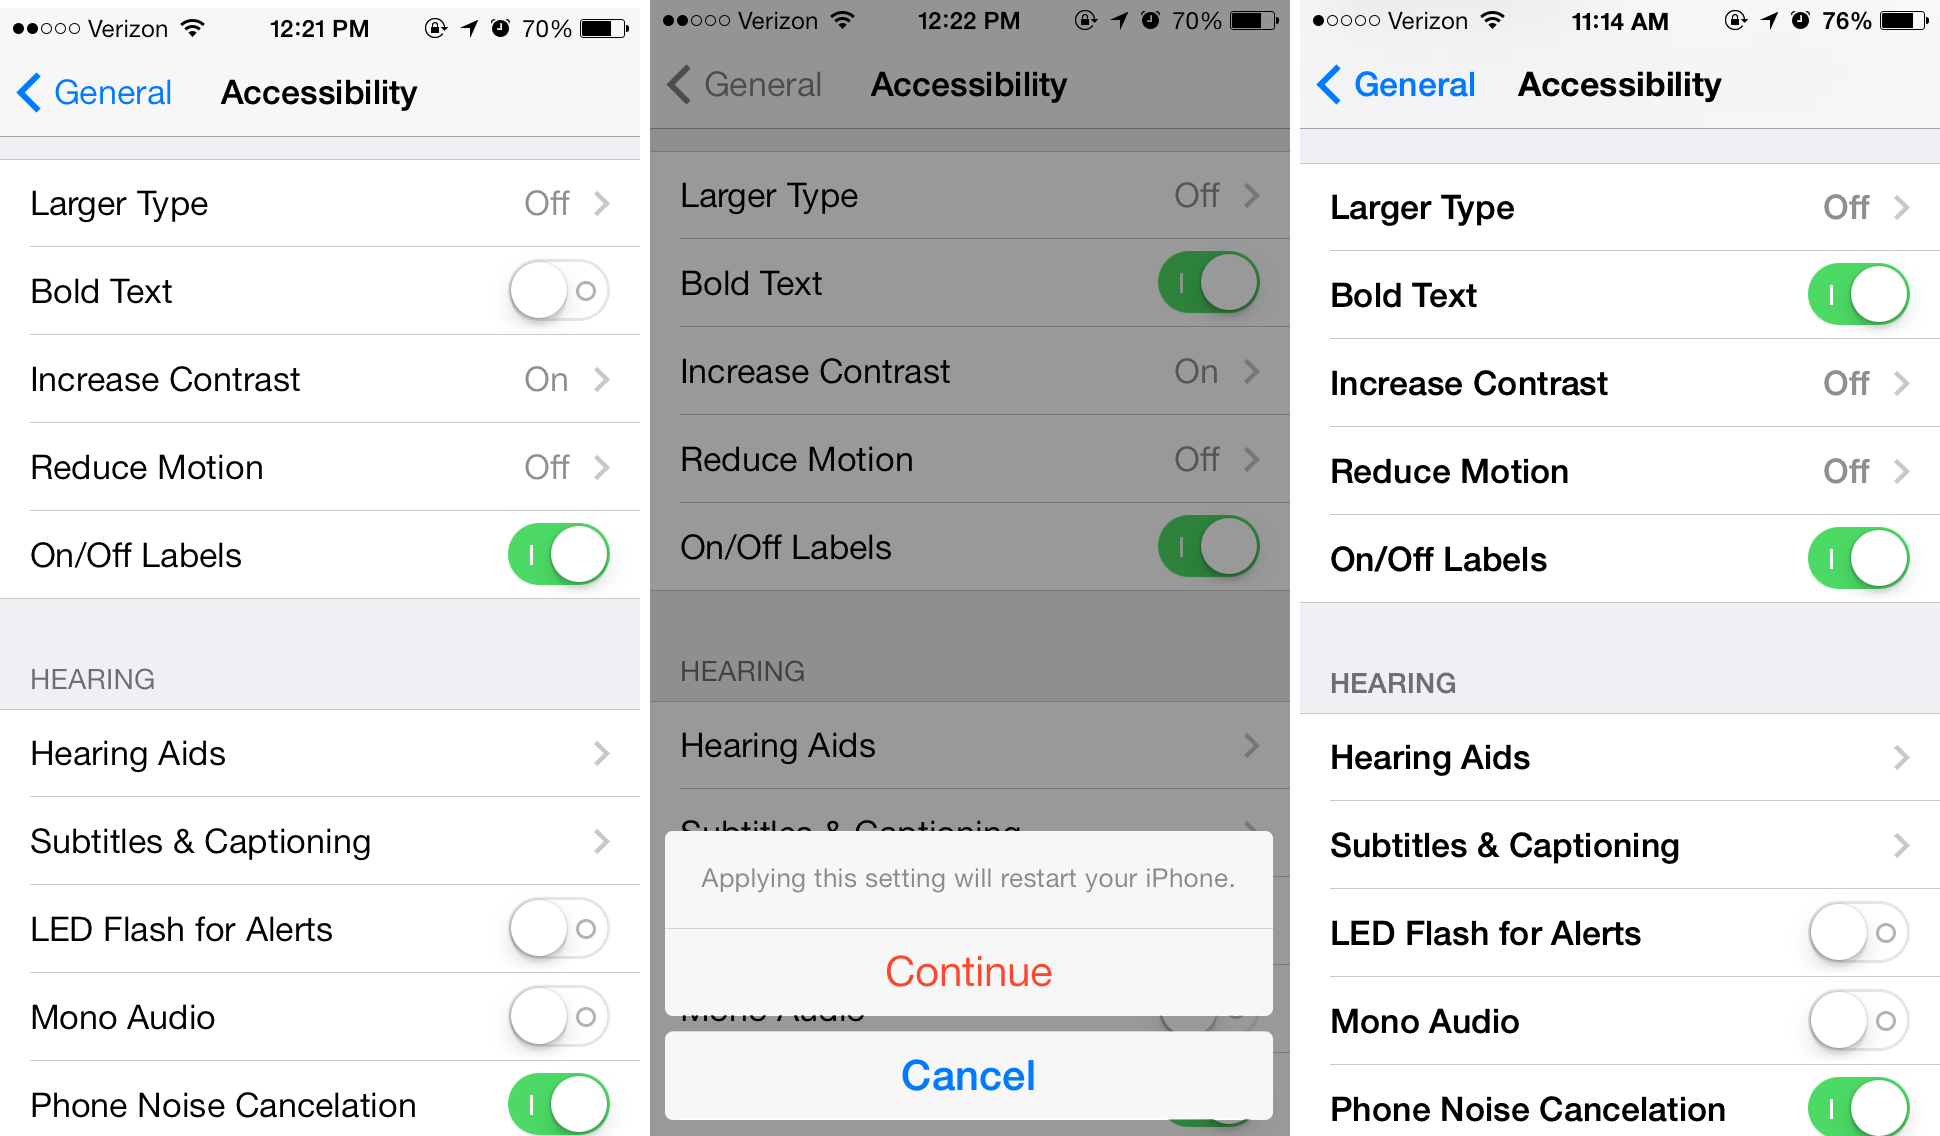
In my testing, I found Bold Text to be quite nice, although I won’t be using it full time. The main problem I found is that it seems to eliminate any differentiation between headers (which would already have been bold) and normal text. For instance, I found messages in Mail harder to read with Bold Text on because, to my eyes, the message metadata (sender, subject, etc.) blended in with the body of the message itself, and I found it off-putting.
Thanks to this loss of certain typographic distinctions and the annoyance of having to restart my device, I won’t be using Bold Text. But my vision is just good enough to get away without it; for others it may be essential.
Increase Contrast — Compared to iOS 6, iOS 7 has markedly lower contrast — the degree of difference between colors. One of the hallmark changes in iOS 7’s visual overhaul is the use of translucency. For example, look at Control Center; if you’re in Messages and swipe up to reveal Control Center, you’ll see a faint blue or green hue underneath, coming from the obscured message bubbles.
While the translucency certainly looks spiffy and, as Jony Ive says, can give users a sense of context, the lack of contrast can be troublesome to many visually impaired users. Acknowledging this problem, Apple has added an option to increase contrast, which it does by removing the blur effect from things like Control Center, Notification Center, and keyboards in order to increase legibility.
To increase contrast, open Settings > General > Accessibility > Increase Contrast and flip the switch.
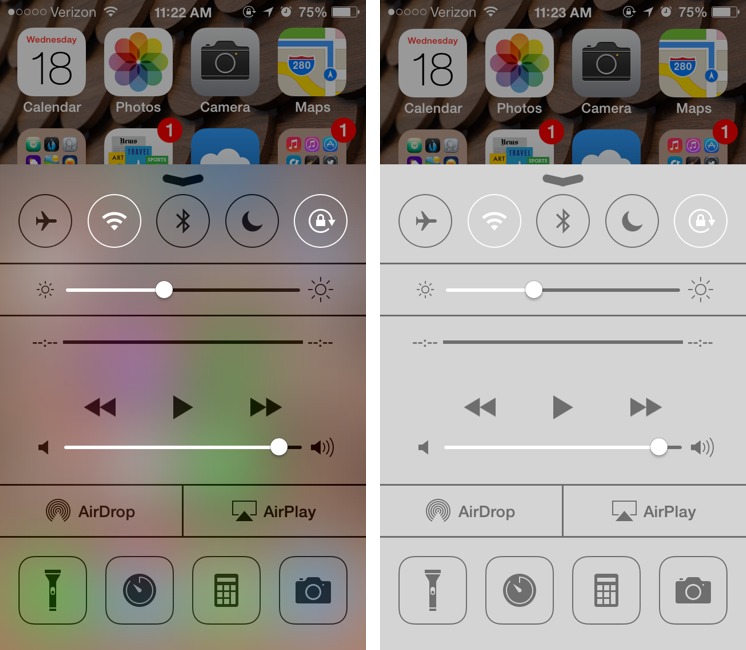
I like the translucency, aesthetically, and find that it doesn’t negatively affect my vision. As with Bold Text, I don’t feel a need to use Increase Contrast. On the other hand, while TidBITS publisher Adam Engst has roughly normal vision, he finds random colors bleeding through Control Center and Notification Center distracting and thus quite likes the Increase Contrast option. And a number of commenters have expressed significant problems with the keyboard, even with Increase Contrast turned on.
Reduce Motion — iOS 7 features subtle parallax 3D effects that give an illusion of depth to the Home screen, Safari’s tab view, and other interface elements. If you find this distracting, you can turn it off in Settings > General > Accessibility > Reduce Motion.
By turning on Reduce Motion, you can rid yourself of the parallax effect, as well as “reduce the motion of the user interface,” whatever that means. Although it does eliminate the parallax effect, as far as I can tell, enabling Reduce Motion on my iPhone 4S did nothing to stop fancy transitions like the icons swooping in to fill the Home screen after unlocking the Lock screen. That’s fine with me, however, since I happen to like the animations and don’t find them visually distracting. As for the parallax effect, I don’t tend to notice it, so I couldn’t tell any difference.
On/Off Labels — In what may be one of the worst design changes from iOS 6, the heavily used On/Off switches in iOS 7 are far less visually and functionally accessible.
Say what you will about skeuomorphism, but from an accessibility standpoint, the On/Off switch was one of the best visual elements of iOS, and I dearly miss it in iOS 7. The switch used not only color (blue) to indicate an enabled setting, but also a clear text label that reported both On and Off states. Plus, each switch was visually indented, which gave it a useful visual separation from the rest of the interface.
In iOS 7, setting switches are just nubs that slide to the right and turn green if enabled, but are otherwise left-aligned and white when disabled. By default they have no text labels at all — an odd decision for a redesign that has often traded graphical buttons for textual buttons. Because they don’t need room for the On and Off words, they’re also much thinner than in iOS 6, making them a smaller target that’s harder to hit accurately.
You can make this a little better by enabling On/Off Labels in Settings > General > Accessibility. Once enabled, you’ll also see a small visual glyph to help distinguish whether a setting is on or off: a vertical line if on and a circle if off.
This choice may be a nod to iOS’s ever-increasing acceptance internationally, since the glyphs are the International Electrotechnical Commission’s symbols for power on and power off.
For many of us, these symbols aren’t nearly as clear as in iOS 6, which plainly stated, in text, whether a setting was “On” or “Off.” To the visually impaired, such obvious cues are important because one’s vision might not be strong enough to detect only color or tiny symbols that masquerade as labels.
Apple’s design in this regard is disappointing. I have the labels turned off, since they don’t help enough to bother, and I see these switches as one of the worst aspects, accessibility-wise, of iOS 7’s redesigned user interface. I can only hope that more explicit labeling along the lines of iOS 6 is brought back in a future update.
A Last Look — Because of its radical visual facelift, iOS 7 is, in my mind, the most significant change we’ve seen to the operating system, not only for normal-sighted users, but also to visually impaired users like myself.
The specifics are a mixed bag, with some design changes helping those with normal vision (or at least offering a different aesthetic) while potentially causing problems for people like me. But, simultaneously, it’s clear that Apple was aware that the new interface could be jarring or difficult for the visually impaired, and took pains to add these vision-focused features to iOS 7’s Accessibility settings to compensate. Whether they’re entirely successful is another question, but Apple should still be applauded for this effort, since it shows the company’s commitment to delivering products that are usable by everyone.
The On/Off label travesty notwithstanding, I feel the new visual Accessibility features are generally implemented well, and will be appreciated by many, ranging from those of us who are legally blind to people who just don’t see as well as they used to. Regardless of where on the vision spectrum your eyes fall, take a few moments to explore these various options to see how they might improve your experience with iOS 7.
The Promise of iBeacons in iOS 7
When Apple first announced iOS 7 at WWDC (see “Apple Unveils Completely Redesigned iOS 7,” 10 June 2013), a feature was listed on one of the SDK slides that was hardly touched upon in the day’s announcements: iBeacons. I’m not surprised that Apple didn’t say much about the feature to the press at the time, since iBeacons, unlike flashy new interface design, snazzy parallax effects, and helpful features like Control Center, is devilishly difficult to describe with a picture and five-word caption. The feature would have been lost in the noise.
![]()
That’s ironic, because the point of iBeacons is to help you find things — or, rather, to help your iOS device to find itself. iBeacons is the general name for a set of additions to the Core Location framework that developers can use when designing apps: it isn’t a new piece of hardware, nor a new app, but a capability. Apps can use iBeacons to answer the question “Where am I?” not in terms of a location on a map, like GPS does, but in terms of where the device is relative to another device.
Specifically, where it is relative to another device acting as an iBeacon.
Think of an iBeacon as a tiny radio you can put almost anywhere. When your iPhone or other iOS device gets within range (a few dozen feet or so), it detects the iBeacon and can estimate how far away it is. Each iBeacon has its own identifier, too, so if your iPhone is within range of more than one iBeacon, it can tell them apart.
Here’s one thing you may be thinking: “Where do I get an iBeacon?” Look in your pocket: if you have an iPhone 4S or later (or a third-generation iPad or later), you already have a potential iBeacon. However, other companies are making standalone iBeacons, such as Estimote.
What makes iBeacons possible is Bluetooth 4.0, along with a Bluetooth radio that supports BLE — Bluetooth Low Energy. As the name suggests, the BLE flavor of Bluetooth is very battery-friendly: it can enable a dedicated iBeacon device to run for many weeks at a time without recharging or requiring a new battery.
Here’s another thing you may be thinking: Why should I care? Actually, you shouldn’t, just yet, unless you’re a developer who wants to create apps that could use fine-grained location awareness. Then you might care a whole bunch.
It’s easy to come up with examples where such a location-savvy app could be handy. For instance, a department store could set up iBeacons all over the place, and an iPhone app designed for that store could use those iBeacons to guide you to the location of items that appeared in search results. Similarly, a city library could distribute an app that guides patrons to specific books among the collections and even allow checkouts, or a museum could offer a tour app, or an airline could offer an app to help you navigate the airport (“Michael, your flight is boarding in 5 minutes at Gate 79, and you’re currently passing Gate 11.”). Or imagine a future version of Find My iPhone that could turn your iPhone into an iBeacon, so, when you
accidentally lose it in the couch cushions, you could wander around the house with your iPad mini or MacBook and play “Getting warmer… getting cooler… getting warmer again” as you search.
What makes iBeacons appealing to developers is that it is easy technology to exploit: your app simply has to tell the location service in iOS to watch out for iBeacons with a particular identifier, and then the app can sit in the background, consuming almost no resources or power, until an appropriate iBeacon comes in range, at which time iOS wakes the app up with the news. And iBeacons should be cheap technology to deploy: standalone iBeacon devices will start out costing less than $100 each, and the price may well drop significantly if the feature becomes popular: given the hundreds of millions of iOS devices out there already capable of using it, iBeacons has a good shot at popularity.
Here’s the bottom line on iBeacons: it can make your iOS device smarter about where it is, but you won’t notice it until developers start making use of the technology. Then your magical device will become just a little more magical.
FunBITS: Tune into iTunes Radio
With the introduction of iOS 7 comes the long-awaited iTunes Radio, Apple’s personalized music streaming service that competes with the likes of Pandora and Songza. iTunes Radio is built into the Music app in iOS 7, the just-released iTunes 11.1 on the Mac (see “iTunes 11.1 Adds iOS 7 Compatibility and iTunes Radio,” 18 September 2013), and the second-generation Apple TV and later, with a forthcoming software update.
For those of you familiar with Pandora and similar services, you might shrug and say, “Well, who cares?” To be honest, you wouldn’t be entirely unjustified in doing so, as iTunes Radio is functionally identical to Pandora, basing stations on genres, artists, or songs. However, what iTunes Radio can offer that Pandora can’t is complete integration with your Apple devices. You can control iTunes Radio via Siri, your Mac’s media keys, or your Apple TV’s remote control. If you hear a song you like, you can buy it immediately or add it to your wish list. And if you’re already paying for iTunes Match, you’re guaranteed an ad-free experience.
If you’re a fan of the Beatles, you’ll be happy to know that Apple struck a last-minute deal to get them on iTunes Radio, making it the only streaming service besides Pandora to feature the Fab Four.
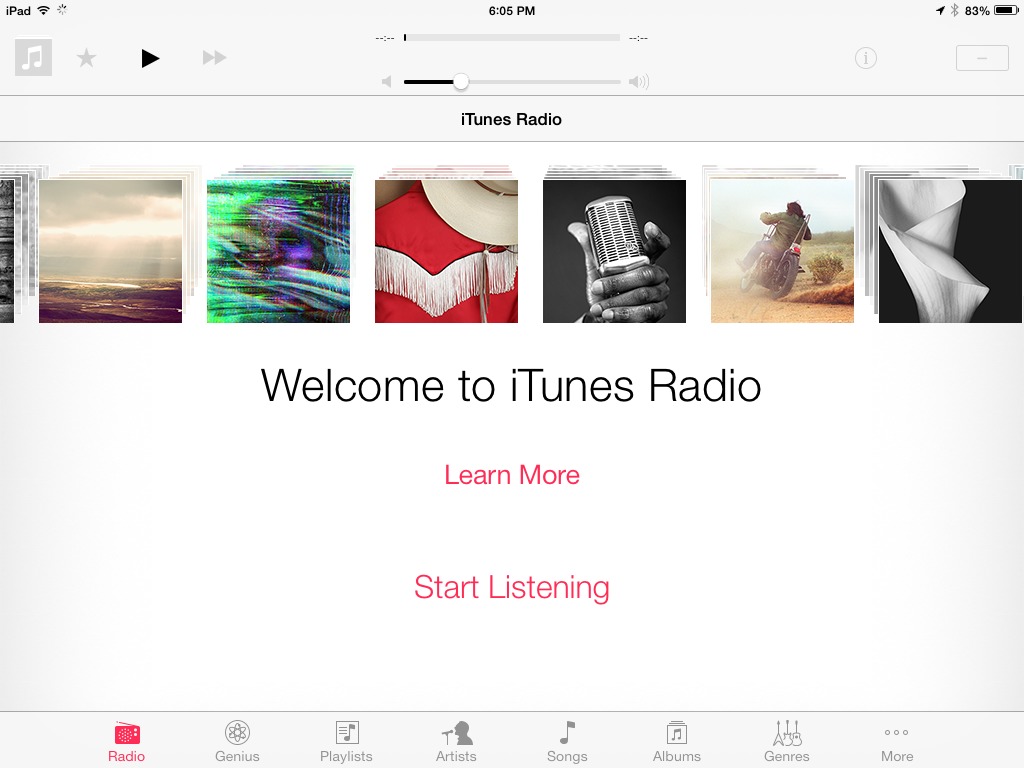
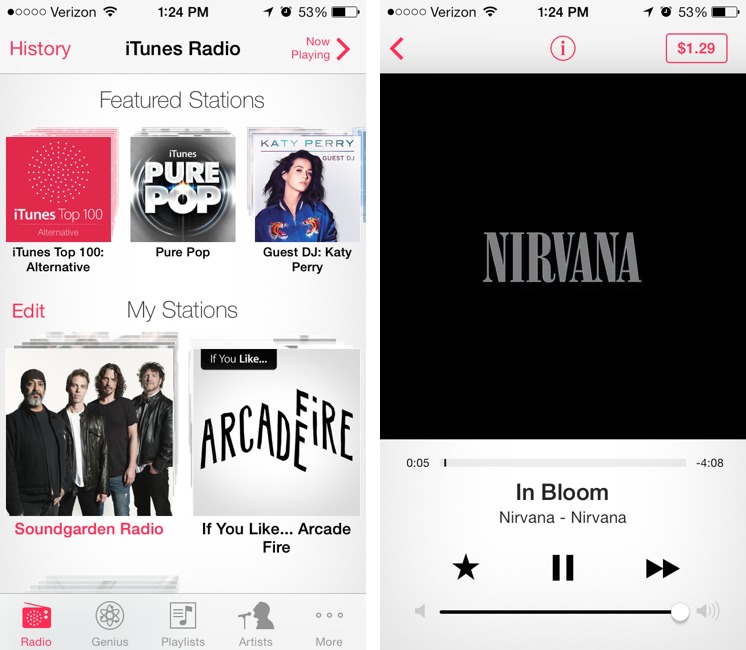
iTunes Radio on iPhone and iPad — To get started, fire up the Music app in iOS 7. You’ll be presented with a big, friendly welcome to iTunes Radio. Tap Start Listening to begin.
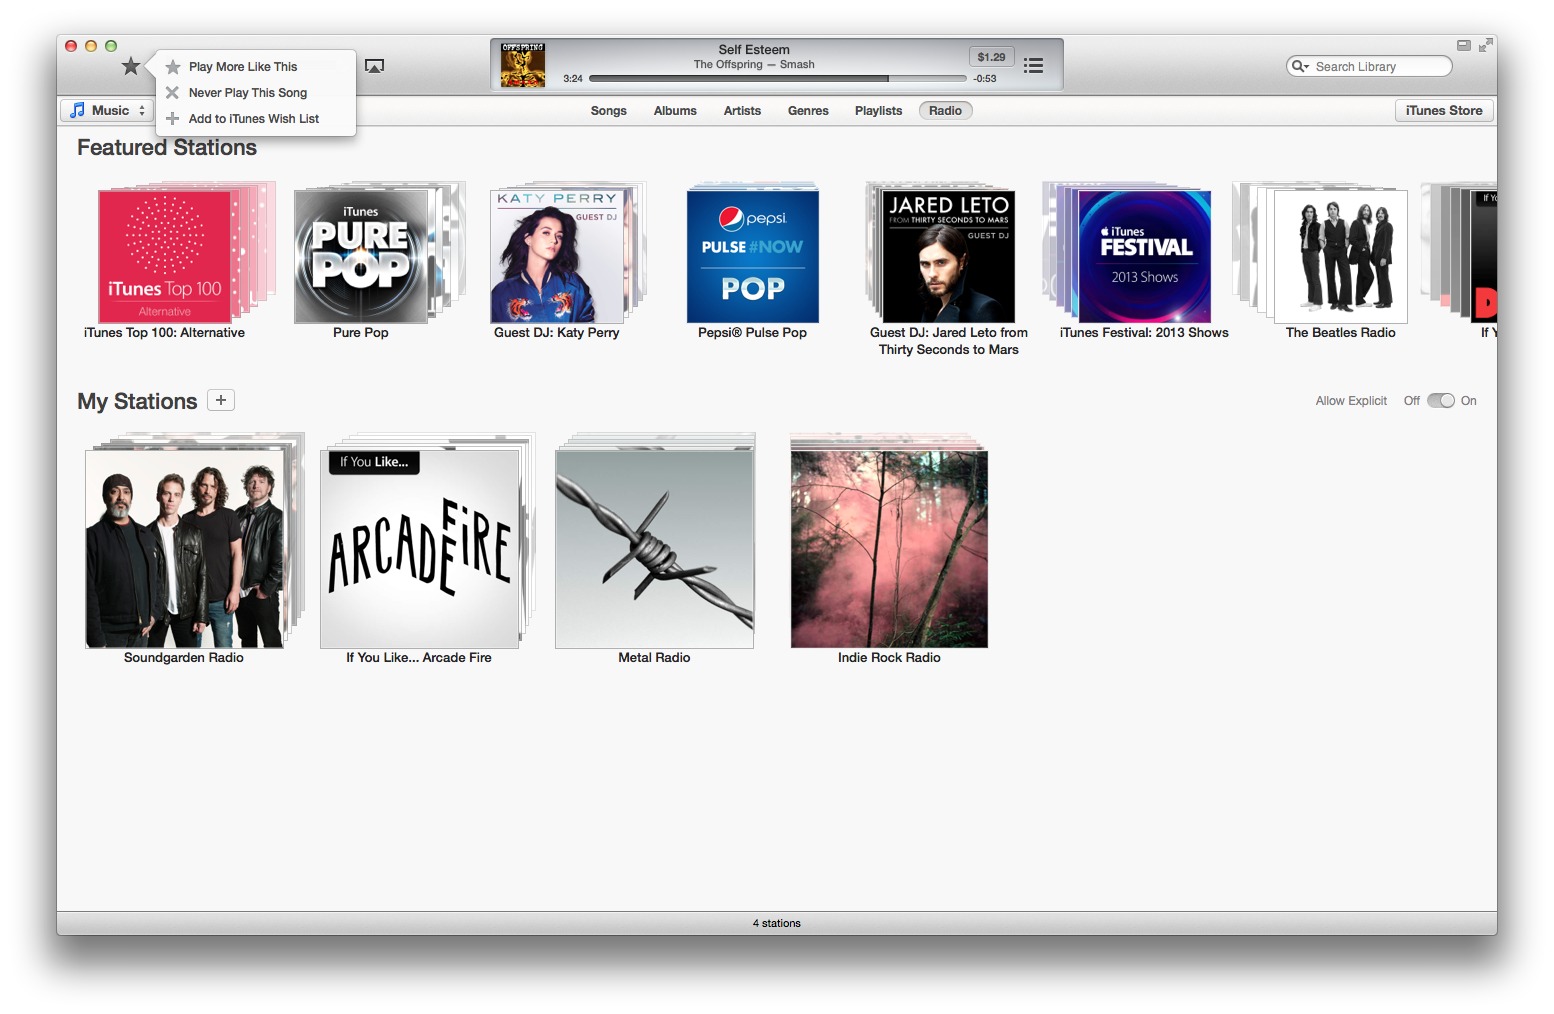
There are three ways to create a new station. The first is iTunes Featured Stations, which change periodically. Just tap one to start playing, and if you like it, tap the info button at the top of the player screen to add it to your stations. More on that in a bit.
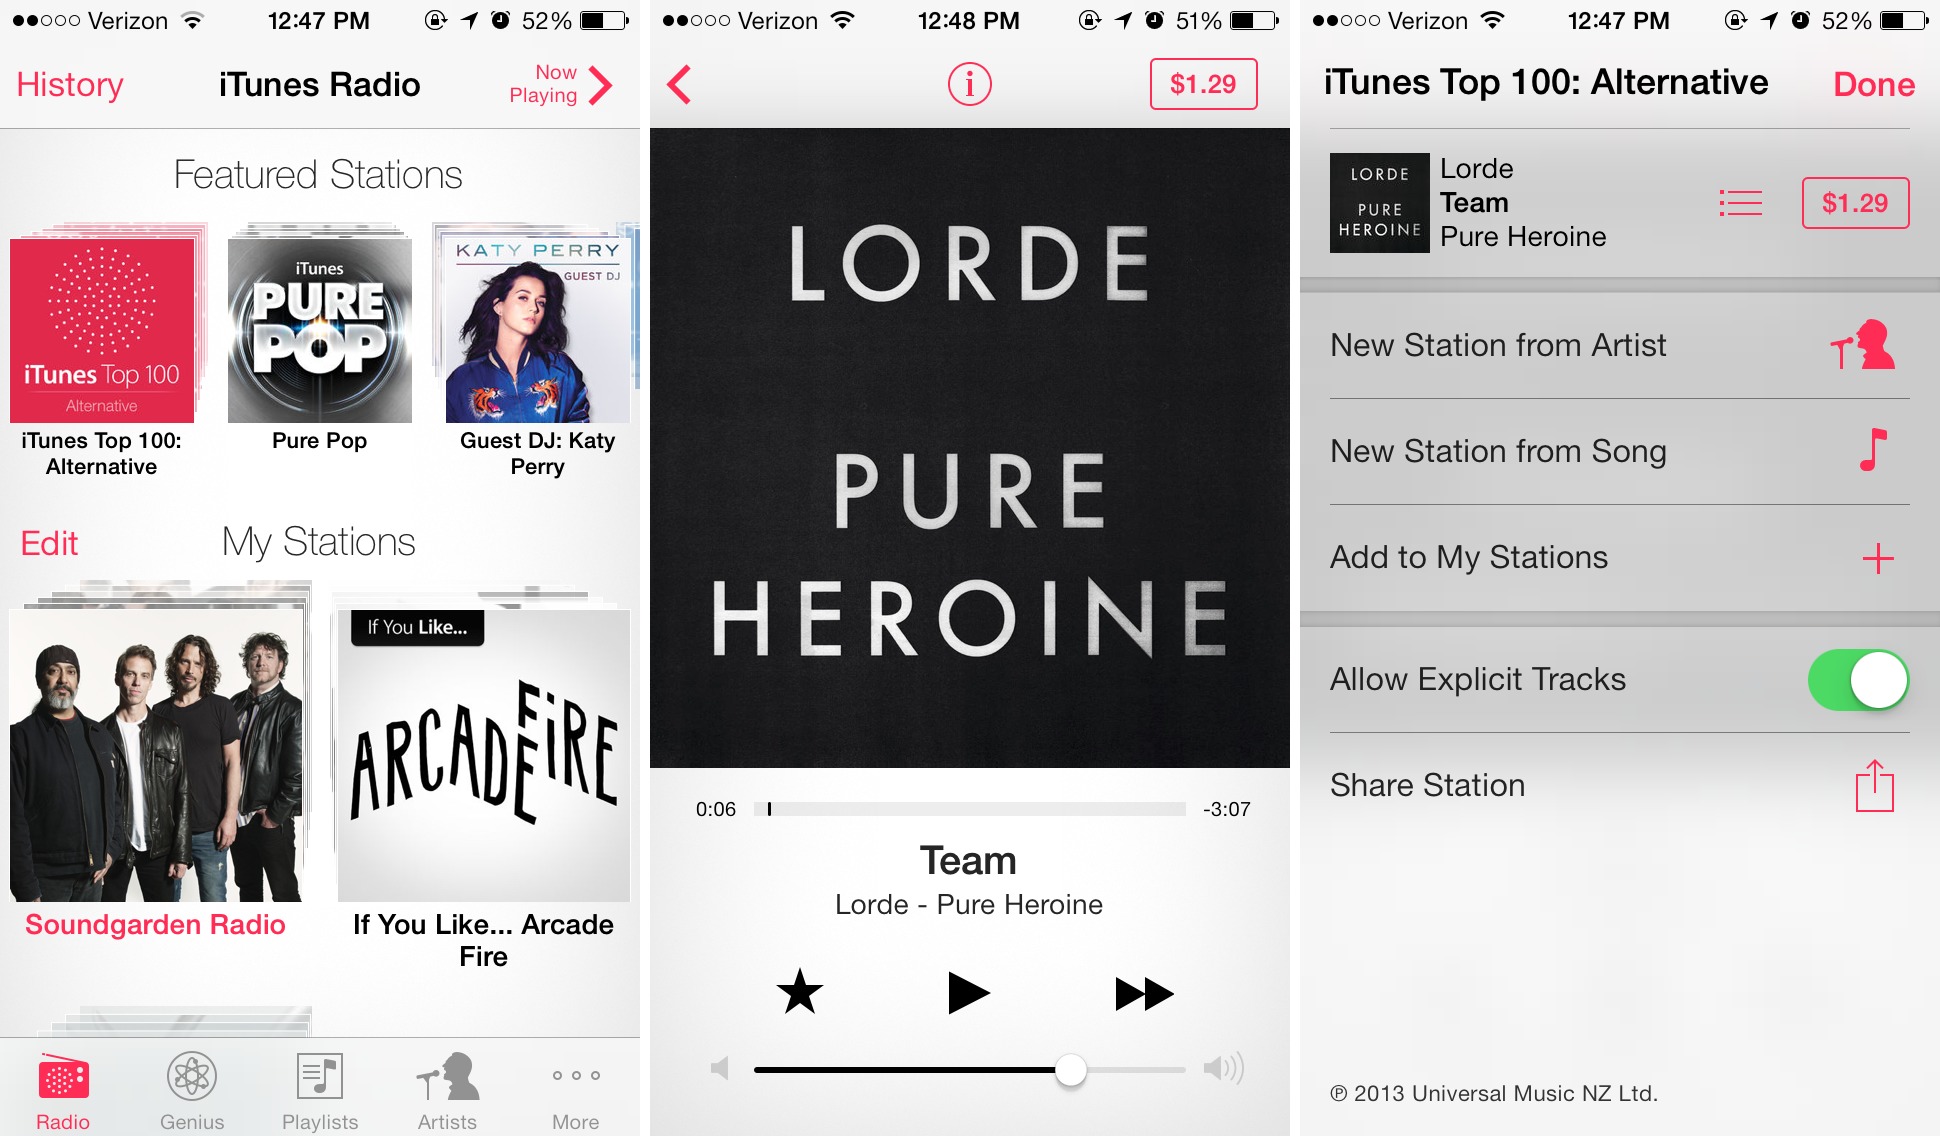
The next two ways start by scrolling down and tapping the New Station button. You can either create a station based on a search for genre, artist, or song, or you can select from a number of genre stations.
Each genre station features a number of sub-genres, so for instance, in addition to the Metal Radio station, you have sub-stations for, amusingly enough, Black Metal, Death Metal, Doom Metal, Grindcore, Hardcore Metal, Thrash Metal, and more.
Once you have a station set up, you can tailor it to your tastes. Tap Edit next to My Stations to edit your stations. If you’d like to delete multiple stations, tap Edit on that screen to present delete buttons for each station. If you want to tweak individual stations, just tap the station name.

When editing a station, you can change its name, share the station with a friend via AirDrop, Mail, Twitter, or Facebook, and, best of all, tell it what to play and not play. For instance, I want my Soundgarden station to play more Alice In Chains, so under Play More Like This, I added Alice in Chains. But I don’t want Nickelback, so under Never Play This, I tapped “Add Artist, Song, or Genre” and added them. If you’d like to remove an item from one of the two lists, just swipe it to the left to reveal the Delete button.
Let’s talk playing music itself. At any time, you can tap Now Playing in the upper-right corner to access the music player. It’s similar to playing local or iTunes Match music, with a few important differences. First, you’ll notice a prominent purchase button with the price of the track. If you want to buy the currently playing song, just tap that to buy it. Of course, you’ll have to enter your iTunes password first if you haven’t bought anything in the past few minutes.
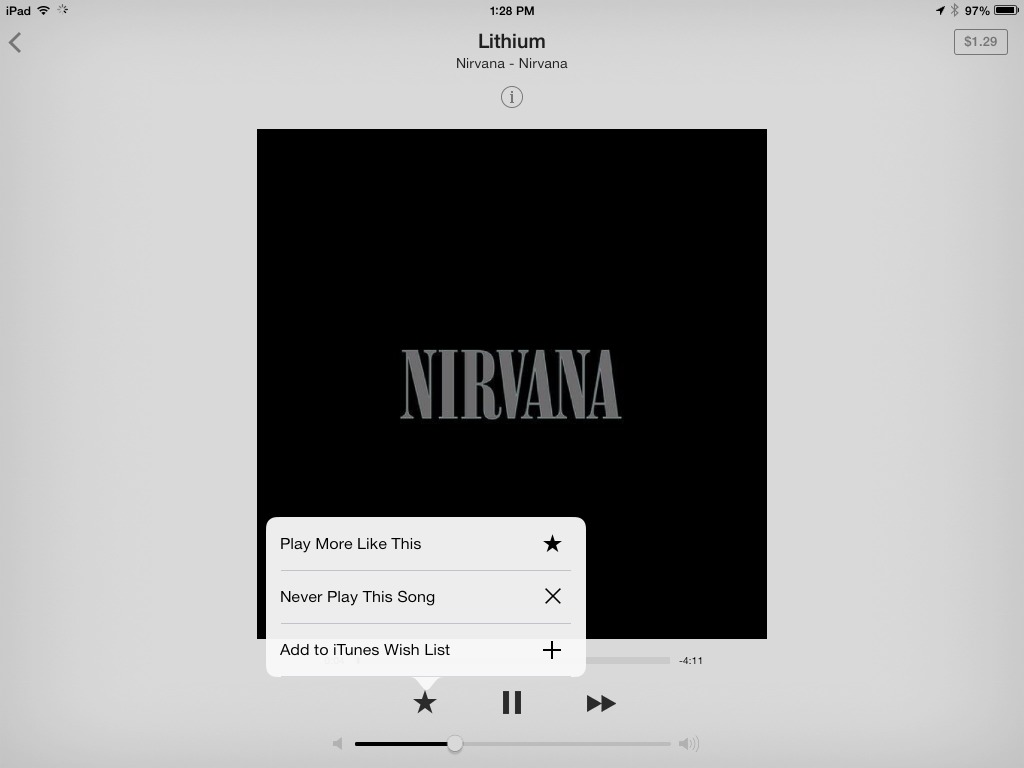
Tapping the star brings up a menu that lets you tell iTunes Radio to play more like that track, never play that song again, or add it to your iTunes wish list. If you make a mistake with the first two, you can always edit the station to fix it. You can also access the star from the Lock screen controls.
The Next Track button does exactly what you’d expect, but you can’t skip more than six times in an hour on a particular station. Rumor has it that iTunes Match subscribers will get unlimited skips, but that has yet to come to pass.
If you tap the Info button at the top, you get a number of options for both the track and the station. You can create a new station with that artist or song, tweak the station to play hits or less-related materials, and enable or disable explicit tracks. Explicit tracks are disabled by default, so if you want them, be sure to turn them on.
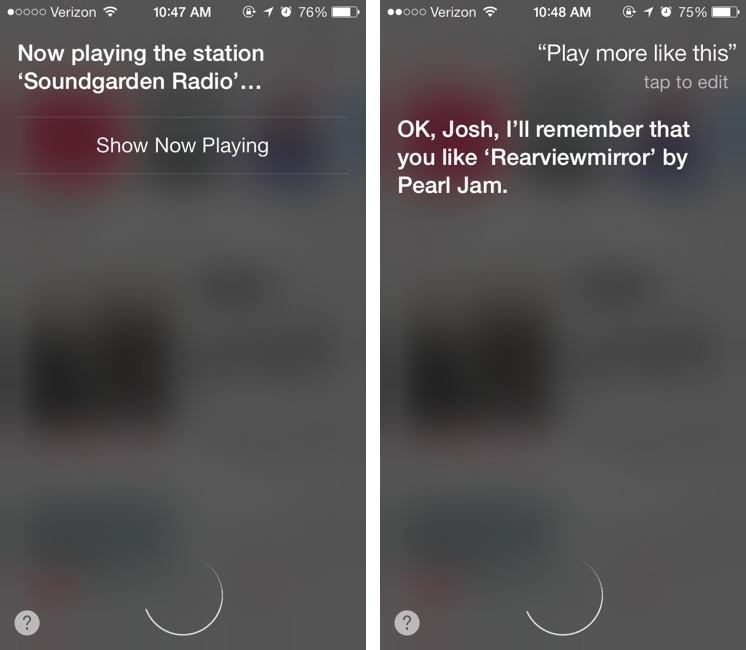
One of the coolest aspects of iTunes Radio is that you can access almost all of its features with Siri. You can tell Siri, for instance, to “play Soundgarden radio,” and it should come right up. Of course, you can say “play,” “pause,” or “skip” to control the player, but you can also tell Siri to “play more like this” or “never play this song again.” Siri can also add songs to your wish list, or tell you what song is currently playing.
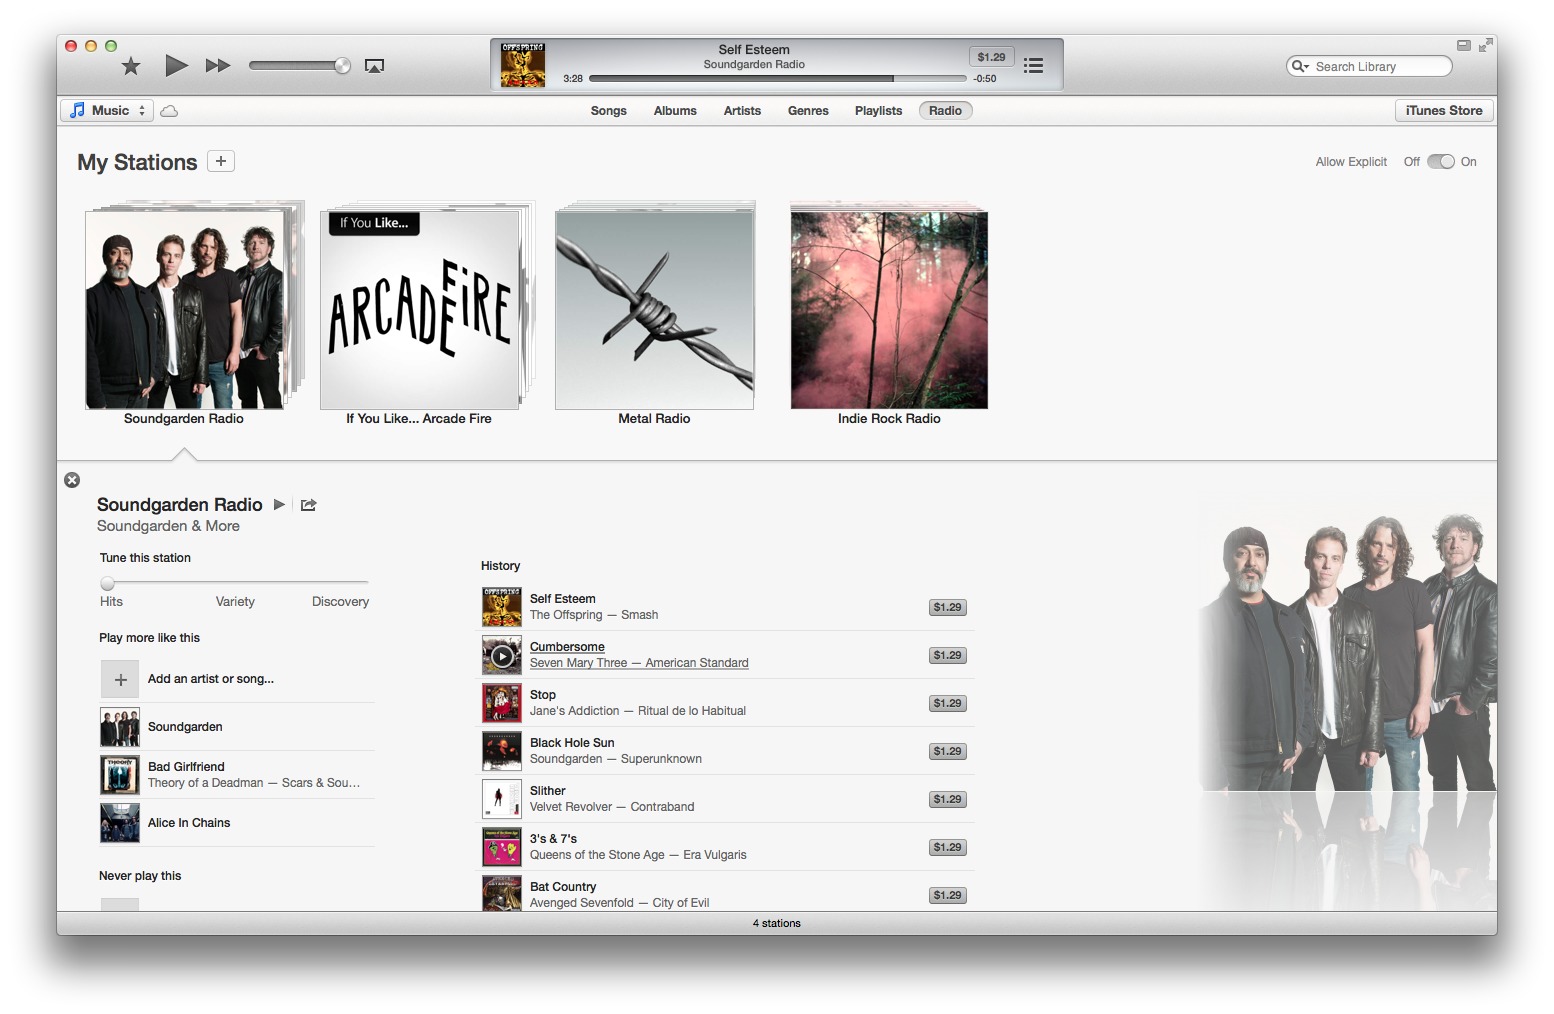
iTunes Radio on Mac — On the Mac (and Windows), iTunes Radio is built into iTunes 11.1. Unfortunately, like iTunes itself, iTunes Radio on the desktop is an interface mess, with controls strewn everywhere.
To get started, enter your music library and click Radio in the list of options at the top. To add a new station, click the plus button to the right of My Stations or select a featured station. As with the iOS player, you can either choose a genre station or search for the genre, artists, or song on which you want to base your station.
The star in the upper-left works like the one in iOS, enabling you to play more songs like the current one, never play that song again, or add the song to your iTunes wish list.
If you hover over the song title, you’ll see an arrow to the right of the title. Click it to reveal a menu enabling you to play more songs like it, never play the song again, add the song to your wish list, or create a new station from the song or artist. To the right of the song information is a button that lets you purchase the song.
![]()
The Allow Explicit switch in the far right of the screen, in line with the My Station label, lets you enable or disable explicit content.
To play an individual station, click the play button in the middle of a station’s artwork. But if you click outside of that button, you can edit the station itself, including what to play and not play. If you double-click the station name, you can rename the station.
iTunes Radio on Apple TV — The Apple TV has been updated to software version 6.0, which brings iTunes Radio to the big screen. To get started, just open the iTunes Radio app from the Home screen.
[Update: Apple released the Apple TV 6.0 update on 20 September 2013, but after numerous reports of the update bricking devices, Apple withdrew the update. It appears that users with the 6.0 update can no longer access iTunes Radio from the Apple TV. However, when it’s available again, this is how it will work.]
You’ll find the interface markedly similar to its Mac and iOS siblings, without any loss of capability. The Stations tab shows you the stations created in the Music app on iOS or in iTunes, as well as Featured Stations. If you want to add a station directly from your Apple TV, you can select Add Station from the Stations tab, or navigate to the Add Station tab. Creating a station on the Apple TV works exactly as it does elsewhere; you can either choose a genre station or search for your own.
You can even edit your stations by navigating to the Edit Stations tab. There, you can enable or disable explicit content, and customize each station by selecting what to focus on and what to avoid.
After starting a station, the music keeps playing even if you navigate out of the iTunes Radio app. To control playback, open the iTunes Radio app again and then navigate to the Now Playing tab. There, you can play, pause, or skip to the next track. If you press the down arrow on the remote, you’ll be presented with a scrolling list of options that let you buy the track, add the station if it isn’t in your list already, add the song to your wish list, create a new station from the artist or song, or view the album in the iTunes Store.
Rock On — Overall, iTunes Radio is a great free service that strengthens the entire Apple ecosystem, thanks to its integration into iOS, Mac OS X, and Apple TV, plus its connections with Siri, iTunes Match, and more. Having control over each station is delightful, and iTunes Radio promises to have at least as good selection as its competition. If you love music and have a compatible device, check it out.
TidBITS Watchlist: Notable Software Updates for 23 September 2013
Apple Configurator 1.4 — Apple has released Configurator 1.4, the essential tool for schools and businesses to manage and deploy software to multiple iOS devices. The update supports the latest features (and restrictions) of the just-released iOS 7, including AirDrop. It enables configuration of the Web content filter, AirPlay mirroring destinations and passwords, AirPrint printers, the Limit Ad Tracking setting, font installation, and Managed Open In, and it allows connecting supervised devices to any Mac and control over whether Control Center and Notification Center
display on the Lock screen. Apple Configurator 1.4 also brings an improved user interface for installing a single profile on unsupervised devices, plus the capability to complete the Apple TV setup assistant and enroll it into Mobile Device Management (MDM) without having to use the remote. (Free, 23.2 MB)
Read/post comments about Apple Configurator 1.4.
ExtraBITS for 23 September 2013
Defying the rumormongers’ drivel, the new iPhone 5s and 5c are a smashing success. Less successful are the Touch ID fingerprint scanner in the iPhone 5s and the iOS 7 Lock screen, both of which have already been defeated by hackers. Before you head to the Apple Store for your new iPhone, be sure to read J. K. Appleseed’s brilliant inside look at being an Apple Genius. Finally, our own Tonya Engst appeared alongside Andy Ihnatko, Mike Elgan, and Rene Ritchie on MacBreak Weekly to discuss iOS 7 and the new iPhones.
iPhone 5s and 5c Sales Top Nine Million — Put rumors of lagging iPhone sales to rest — Apple has announced that it has sold over nine million of the new models in just three days. It’s the biggest iPhone launch yet, nearly doubling iPhone 5 launch weekend sales of five million. Also, more than 200 million iOS devices are now running iOS 7, which is double the number of devices upgraded to iOS 6 over the same period a year ago and perhaps as much as 60 percent of the currently installed base.
Touch ID Already Defeated — The Chaos Computer Club has reportedly figured out how to defeat Touch ID, the fingerprint scanner in the iPhone 5s, with a fake finger. The method involves taking a 2400 dpi picture of an approved fingerprint, laser printing the image with a thick toner setting, and smearing latex on top to create a mold. Starbug, the hacker who performed the tests, said that the main difference between Apple’s sensor and others is that Apple’s has a higher resolution.
Gonzo Tales from the Apple Store — At McSweeney’s, the pseudonymous “J. K. Appleseed,” an Apple Genius, shares insider tales from the Apple Store, including training the elderly, comparing the Genius Bar to The Wall from “Game of Thrones,” and even a fist fight. Along the way, Appleseed drops interesting Apple Store trivia. Did you know that each glass step in an Apple Store costs over $35,000 to install?
Lock Screen Vulnerability Found in iOS 7 — In iOS 7.0, a vulnerability has been discovered that allows anyone to bypass the Lock screen passcode. Swipe up from the bottom to access Control Center, then open the Clock app. Then hold the Sleep/Wake button until the option to power off the phone comes up. Tap Cancel, then quickly double-press the Home button, which brings up the multitasking screen, providing access to most open apps. Oops! To eliminate the problem for now, just disable Control Center on the Lock screen in
Settings > Control Center. An Apple spokesperson said the company is working on a fix.
Tonya Engst Chats about iOS 7 and New iPhones on MacBreak Weekly — Our own Tonya Engst joined Andy Ihnatko, Mike Elgan, and Rene Ritchie on TWiT’s MacBreak Weekly to discuss iOS 7, the iPhone 5s and iPhone 5c, and whether it’s wise to bring a non-Apple phone to an Apple press event.