Use Keyboard Viewer to Type Special Characters
Character entry? Isn’t that what we used to call “typing”? Yes, but how can you type characters that aren’t printed on your keyboard, or aren’t available at all through any key combination? There is of course the venerable PopChar X from Ergonis if you need to insert special characters frequently, but what if you need just the occasional copyright symbol, checkmark, cents sign, or does-not-equal symbol?
It turns out that Apple provides some useful character discovery and entry tools, and in this excerpt from “Take Control of Fonts in Snow Leopard,” I’ll share what you need to know about one of them: Keyboard Viewer.
If you’re interested in Mac OS X’s font handling in general, I hope you’ll take a look at the book, which has 225 pages of details on font history and architecture; how fonts work in Mac OS X; how to organize fonts; how to deal with fonts from Adobe Creative Suite, Microsoft Office, and Apple’s iLife and iWork suites; and much more. It’s only $15, and is the definitive book about fonts in Mac OS X.
Turn on the Keyboard and Character Viewers — Mac OS X provides two text-input tools, Keyboard Viewer and Character Viewer, to help handle the problems resulting from three issues: not all characters are printed on your keys (where the heck is ©?); most accented characters need to be generated with a special key sequence; and many fonts have characters that can’t be typed with any key combination.
(Note that among the minor changes from Mac OS X 10.5 Leopard to 10.6 Snow Leopard was the renaming of Character Palette to Character Viewer. When I refer to “Character Viewer,” translate that to “Character Palette” if you’re still using Leopard.)
Turn on the tools in Snow Leopard:
- In the Keyboard system preference pane, click the Keyboard button.
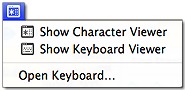
- Check Show Keyboard & Character Viewer in Menu Bar to put the Input menu in your menu bar with both items listed.
Turn on the tools in Leopard:
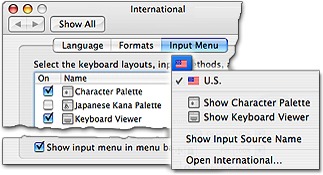
- In the International preference pane, click the Input Menu button.
-
Check Character Palette and Keyboard Viewer in the list.
-
At the bottom of the window, check Show Input Menu In Menu Bar to add the Input menu to your menu bar. Checking items in the list populates the menu, which includes a shortcut back to the International preference pane.
Character Viewer is also available from several other places, in both Leopard and Snow Leopard. In the Finder, TextEdit, and other programs that strictly follow Apple guidelines, Edit > Special Characters opens Character Viewer. This command works whether or not you’ve added the Input menu to the menu bar.
If you have an Input menu for foreign language keyboards but haven’t put Keyboard Viewer and Character Viewer in the menu, the Special Characters command not only opens Character Viewer but also adds both Viewers to the menu.
Keyboard Viewer’s Font Menu — Not all evolution is an improvement, and that of the Keyboard Viewer is a case in point. The original version was useful for more than just finding accented characters; it had a Font menu so you could see where every character lived in each font. With all fonts assumed to be Unicode compliant, however, characters should be in the same place no matter what the font. By the time Leopard showed up, Keyboard Viewer lost its menu bar Font menu.
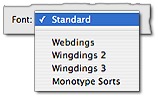
In Leopard, Keyboard Viewer has a pop-up Font menu (which is more likely short for “font mapping”), with choices limited to Standard, which shows character placement for the currently selected language and a short list of PiFonts – picture fonts – that Mac OS X considers worthy of the label. The screenshot below shows an example of Mac fonts that are so worthy; if you have Microsoft Office 2008, the list includes Bookshelf Symbol 7, Marlett, MS Reference Specialty, and MT Extra. Unfortunately, Keyboard Viewer is of no help if you’re using a picture font not listed – such as, oh, say that seldom-used, little-known Zapf Dingbats.
Snow Leopard’s Keyboard Viewer evolution goes even further: no Font menu at all!
Find Option Characters — Since the dawn of the Mac, we’ve been able to access up to four characters from each key on the keyboard: with and without the Shift key, with Option, and with Option-Shift. Many of the Option and Option-Shift characters – especially the ones you’re likely to use often – are easy to remember because some thought went into their placement: there’s often a relationship between at least one of the characters printed on a key and the Option or Option-Shift character.
You can check out the entire Option and Option-Shift character sets, and look up characters whose positions you can’t remember, with Keyboard Viewer: open it from the Input menu, and hold down Option or Option-Shift to see the characters those modifiers produce.
Click Keyboard Viewer keys, or just type, to enter a displayed character. The best approach, however, is to learn what key combinations produce the characters you use often, and use mnemonics like those in the table below to help remember them.
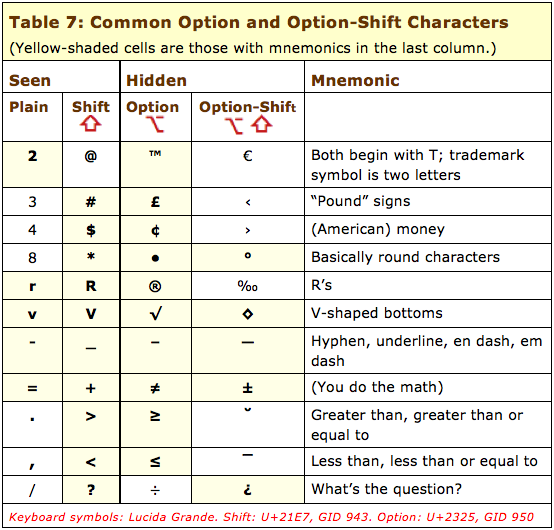
(Note that the key combinations in this table and described elsewhere in this section hold for only the U.S. keyboard. With a different input keyboard or a different Mac OS X system language, even some common characters can be in different places.)
Type Accented Letters — The Mac has always provided an easy way to type a letter with one of five common accent marks (for use in words like déjà vu, naïve, rôle, and El Niño) through the use of dead keys: keys that don’t produce anything until you hit another key. The Mac’s dead keys are Option-key combinations, and typing a subsequent letter produces the accented letter:
- Press the Option key combination that produces the accent.
The dead keys are only half-dead in Mac OS X, so you’ll see the accent in your text, with a squiggly line under it – or some other type of highlighting, depending on the program – to signify that you must type another letter.
-
Type the letter to be accented.
Accenting is restricted to certain letters – you can’t just put an umlaut on the letter x because you feel like it. The accents and their key combinations are as follows in this screenshot:
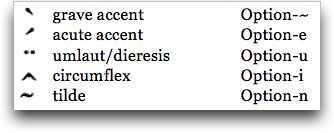
To get é, for example, all you have to do is press Option-e for the acute accent and then type e. The final accented letter is a single character generated from what you typed, so a single backspace erases it.
Using dead keys is just a clever way to type characters that are otherwise unavailable from the keyboard. You could enter é in other ways – through Character Viewer, for instance, or with a foreign language keyboard – but why bother when this method is so easy?
When you need one of these accents but can’t remember the key combination, Keyboard Viewer can help. It shows both the accent keys and the accentable letters, as shown in this screenshot.
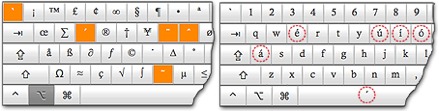
Holding down Option in Keyboard Viewer highlights the accent keys (left); the available accented letters show up when you type or click one of the accent keys (right). This figure shows the accented letters that can be produced using Option-e. I added the red circles – Keyboard Viewer is not as enthusiastic about showing you the accented letters.
If you keep Keyboard Viewer open while you’re typing, you have the option of clicking its keys to enter the accents and letters:
- With Keyboard Viewer open, hold down the Option key.
Keyboard Viewer highlights the accent keys.
-
With Option down, press one of the accent keys or click it in Keyboard Viewer.
-
Release the Option key.
The Keyboard Viewer display changes, showing the accent over the letters that can use it.
-
Type (or click) one of the accented letters to enter it.
To type an accent by itself, type a space after using the accent’s Option-accent key combination.
Type More Accents with the U.S. Extended Keyboard — Roman-based languages use many more accents than the five basic ones that Mac dead keys have always provided. In keeping with the Unicode lots-of-characters spirit, Mac OS X provides 19 dead-key accents with the special U.S. Extended input keyboard. (I explain input keyboards in more detail in “Use Different Keyboards for Foreign Languages or Other Special Input” in the book.) Here’s how to activate the U.S. Extended input keyboard:
- Open a preference screen:
- Snow Leopard: In the Language & Text preference pane, go to the Input Sources screen or choose Open Language & Text from the Input menu.
-
Leopard: In the International pane, go to the Input Menu screen or choose Open International from the Input menu.
-
In the list of “input methods,” check U.S. Extended; this automatically checks U.S., as well.
-
Open Keyboard Viewer from the Input menu.
-
Choose the U.S. Extended keyboard from the Input menu. (Its menu bar icon differs from the standard U.S. keyboard by the little add-on U, for Unicode.)
Sometimes Keyboard Viewer doesn’t update when you choose an input keyboard from the Input menu. If the Keyboard Viewer’s title bar doesn’t reflect your keyboard choice, close and reopen it.
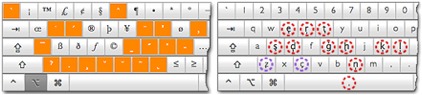
Now you can use Keyboard Viewer to access the larger selection of accents and accentable letters the same way you use it for basic accents with the standard U.S. keyboard: hold down Option to see the accents, type the one you want, and then type the letter; see the screenshot. This example shows the results for Option-C, the cedilla accent.
Not all fonts include all the accented characters you see in Keyboard Viewer. If you type a character that’s not in your current font, it’s entered in your document in a different font – one that actually contains the character.
Why not always use the Extended keyboard? Because it giveth with one key and taketh away with the other. With all those accents given over to the Option key, you’ve lost standard Option characters like the √ from Option-V and π from Option-P.
Apply After-the-Fact Accents — In some applications, and with certain fonts (yes, that’s vague, but with so many variables the best I can give you is a “more often than not”), you can type a letter first and then use an Option-Shift-accent combination to add the accent when you have the U.S. Extended Keyboard active.
So, in TextEdit, for instance, you can choose Helvetica, type o and then press Option-Shift-U, and wind up with an umlaut over the o (this is needed to spell the names of heavy metal bands like Mötley Crüe properly). For a list of the Option-Shift combinations you can use for applying accents this way, see Tom Gewecke’s diacritics page.
More about Character Entry — While Keyboard Viewer is helpful for entering Option- and Option-Shift characters, and accented characters, what if you want to enter a character that can’t be typed from the keyboard at all? That’s where Character Viewer comes in, and the full “Take Control of Fonts in Snow Leopard” has 16 pages showing you how to find and enter such characters via Character Viewer. Along the way, it devotes 12 pages to explaining the glyph approach to font characters, describing how characters that lack Unicode IDs are handled, and showing why you should care about alternative characters. Plus, if you’ve
ever felt limited by the characters in Zapf Dingbats and Webdings, you’ll have fun exploring all the dingbats available in other fonts, including the dingbat-rich Hiragino Kaku Gothic Pro.
Besides the US Extended keyboard layout, Snow Leopard also has a "US International - PC" layout, which reproduces the common layout used on Windows for producing accented characters on the US keyboard.
Most international users migrating from Windows prefer this layout to the Mac's option+character method.
Users of Leopard (10.5) and earlier systems can download the original layout from my site: http://brockerhoff.net/usi
Despite removing the fonts menu from Keyboard Viewer, Apple still does include some non-Unicode fonts with OS X which map symbols to Latin: Bodoni Ornaments or Type Embellishments One LET are examples I think.
Yes, that's true. I refrained from making extremely disparaging remarks about the downward spiral of Character Viewer's attitude with each system upgrade, so I didn't hammer home how ridiculous it is to provide Latin-mapped non-Unicode compliant fonts and not let them be seen in Viewer. Webdings (all 3), Wingdings, and Apple Symbols are also mapped like that.
I think Web/Wingdings and Symbols are in fact Unicode compliant, the former having their characters at Private Use Area codepoints, and Symbols having them in the appropriate Unicode symbols ranges.
You don't have to start out with "I think..." to be polite, you know. I always bow to your superior technical font knowledge! And, of course, you're right; I was seduced by Font Book's sample display when I thought I had set it to my custom alpha-numeric example.
it seems to me that some of the portable Mac keyboards behave differently than described. For example on my MacBook 4,1 (black), running the latest Snow Leopard, Option-e does not make Keyboard Viewer show the accented characters available (though it shows the 5 accents). Neither does it show the augmented keyboard map when US international is selected (though the map becomes much larger.
You worried me there for a minute - that I had missed a change from some system upgrade, or something, because I whipped out Kbd Viewer and, lo, you were right - I couldn't get accented letters to appear (using my MacBook Pro).
Here's the deal, though: Viewer displays the accented letters (after pressing Option, and then one of the "triggers") only when you can actually type them into something. Picky, picky! So, with my email open, but not a message window - which is how I read your comment - no accented letters show. But open a message window, where text can be entered - and voilá! (Let's see if that accent gets posted correctly)
COMMENT:
Your « voilá », I do believe, should read «voilà ».
I do have little merit in this note, as I use the Français canadien (CSA, or ISO Standardised)) mapping.. which is very good for both non diacritical English characters and French diacritical ones. As to the meaning of Voilà, « there it is » or close to that, it applies here!
Best regards from Québec.
Bertrand Morin
Thank you for the demonstration that our site can support Unicode punctuation and characters! It took a long time to make that all work (through JavaScript, Apache, HTML standards, perl, and MySQL)!
Note:
I also use PopChar to enter various characters (letters, symbol, marks, etc.), in many fonts (those in your system). It is worth having a look at. There are alternatives, but I do prefer PopChar.
I always try to give readers ways to do things within the OS (read: "free") even when there's an alternative. However, not only do I mention PopChar, but the book includes a 20% discount on the purchase of PopChar. (Though too late for you, apparently!)
You are, of course, correct, and I do know the difference (I've corrected other people) but I was a) in a careless hurry and b) Using a hi-res MacBook which, with its smaller characters, didn't let me clearly see anything other than a smudge over the "a" so I knew it was accented! (And I didn't use Keyboard Viewer, just typed it, which is where the careless hurry took over.)
Sharon,
A common and universal way of life. Mine is aggraveted, as I do have to « switch » in an almost continuous manner, from English to French, namely in the naming of Apple MacOS components (my system is French-Canadian, very similar to the french (France) one.
Tourelou,
Bertrand
Hi:
It is also interesting to see how Safari handles these option characters, such as entering option v into the address bar. Try it to see what I mean.
Cheers,
tedd
I'm getting simply the √ square root/checkmark character that Option-V is supposed to get. Are you getting something else?
I am the original poster of this thread. I tried Sharon's suggestion using this comment window, Option-e still does not show "é" in keyboard viewer -though I can obviously generate the character in 2 steps -indicating that the window does accept accented characters.
On a different matter (is this ok in a thread?) when I copy accented characters into some programs e.g., EndNote 2, these characters come out incorrectly though I can edit them in using character viewer. Can this behaviour be changed? (If it is inappropriate to ask here, but it is something covered in your book; just say so & Ill get the book :-)