In Search of the iTunes Media Server
From the beginning, iTunes has been a personal music player and organizer. The “personal” is important here: iTunes seems tuned, as it were, for handling one person’s media collection.
By default, iTunes puts your media in your account’s Home directory at ~/Music/iTunes. Unlike the myriad Fonts folders in Mac OS X, there is no corresponding Music folder that’s available to all users of a particular Mac. Although the iTunes application itself is shared among users on a Mac (or on Windows, for that matter), each user has his or her own iTunes folder in the Music folder of the user’s home directory, and each running instance of iTunes looks at only one iTunes folder, and displays the contents of only one media collection, for each user.
For those of us who have spouses, companions, siblings, children, or parents with whom we share both musical tastes and living quarters, the “one person, one media collection” model doesn’t work well. Nor does it work well even for one person, if that one person has, for example, a computer in a home office and another in the living room, and wants access to the same iTunes library in both places. What we want is a central iTunes library that everyone on a home network (or using separate user accounts on a single Mac) can share when each of us runs iTunes. But that’s not quite what Apple has given us.
Apple’s Sharing Solutions — Over the years, in various versions of iTunes, Apple has attempted to ameliorate the media-sharing problem to some extent, although their attempts have been hobbled by, among other things, their contractual arrangements with, and the influence of, the music publishers who stock the iTunes Music Store (and who, truth be told, would be more than happy if you had to pay for music each and every time you listened to it).
- CD sharing: This is the oldest method of music sharing that iTunes supports, and the most limiting. You burn a CD containing the songs you want to share. The disadvantages of this method include the cost of the media and the limited storage available. Furthermore, if you’re sharing DRM-protected music, you also may have to deal with the limited number of times you can make an audio CD from the same playlist of protected music (currently seven times), and that CD then must be imported into the recipient’s own iTunes library, with a concomitant loss of some fidelity.
- Shared libraries: You can use this iTunes feature to make your iTunes library visible over a local network to iTunes running on other computers on the network. The main disadvantage of this method is having to keep iTunes running on the computer sharing the library for the library to be visible – if you shut down the iTunes host computer, or put it to sleep, or log out of the account running iTunes, or if iTunes crashes, the other users can’t access the music. Also, those sharing your library can’t create their own playlists of your music, but are restricted to the playlists that you have created and shared. Nor will they be able to keep track of their play counts or rate the music for themselves. And, finally, only five
other users can connect to your iTunes library within a 24-hour period. -
Home Sharing: This feature is Apple’s latest spin on iTunes media sharing (and it may be their preferred sharing method going forward – until they come up with some other way). You can turn on Home Sharing to allow other iTunes users on a local network to copy iTunes media items between computers. You can also set Home Sharing to synchronize media purchased from the iTunes Store automatically: when you buy music or video on one computer, the files are automatically copied to another.
The disadvantages start there: Home Sharing synchronizes only iTunes Store purchases – songs from ripped CDs, GarageBand ditties, and other stuff you must copy from one iTunes library to another manually. Other disadvantages include having to go to each computer and enter your Apple ID and password, being limited (again!) to only five computers for sharing (one of the Brady Bunch kids would be left out), and the fact that the items are not really being shared but copied and, therefore, taking up space on every computer on which they are “shared.”
Note, too, that Home Sharing shares media from one iTunes Store account among multiple Macs, but not among multiple iTunes Store accounts. This can create its own set of problems. Consider a parent (let’s call him Rupert) who shares his iTunes Store media with three teens via Home Sharing. If one of those teens (let’s call her Sophie) buys an app on her iPod touch with her own iTunes Store account and then wants to share that app with her siblings, Home Sharing must be turned off and then turned back on using Sophie’s iTunes Store account, not Rupert’s account. And that only takes care of the original sharing of the app: once that app is copied to everyone else’s iOS devices, each time the developer updates the app, the siblings have to
enter the correct password for Sophie’s iTunes Store account. If Sophie changes her password, nobody can update the app unless she shares her new password (“Da-a-a-ad! Sophie won’t let me update my Fall Fashion Guide app!”).
However, if you step away from Apple’s supplied solutions, and if your home network is up to the challenge, you may be able to build your own iTunes media server. Some small inconveniences will remain, and some protocols (the human kind, not the computer kind) will have to be observed, but you, and everyone on your local network, will all share a central iTunes media repository. (If it all works, of course: see the conclusion of this article, “What Could Possibly Go Wrong?” for some of the obstacles you can encounter.)
But first, a quick digression. Some non-Apple media syncing solutions do exist, although that’s a topic complex enough to deserve its own article. Until we get around to it here at TidBITS, you can take a look at Macworld’s “Sync your iTunes libraries” by our own Joe Kissell.
And now, back to the show, which is already in progress…
The iTunes Folder and Its Contents — iTunes “wants” to find its iTunes Library in ~/Music/iTunes. Note that we said Library not library. The iTunes Library is a file that lives at the top level of ~/Music/iTunes. It contains a database that includes information about all the songs and other media in your iTunes collection, along with playlist information and other bits of housekeeping information.
There are other database files in ~/Music/iTunes as well, such as iTunes Library Genius.itdb, which contains information related to the iTunes Genius feature. iTunes looks for all these database files in ~/Music/iTunes, and if it doesn’t find them there, it creates them.
None of these files, though, contains your actual iTunes media collection (what we have been calling your “iTunes library” – small “l”). All of your music, videos, podcasts, books, iOS apps, and other media, at least starting with iTunes collections created by iTunes 9, is in your iTunes Media folder. This is the folder that you want to use as the basis of your homegrown iTunes media server.
Hold Yer Horses! What iTunes Media Folder? — We’re sure that some of you have opened your ~/Music/iTunes folder only to find no iTunes Media folder. Instead you probably saw several folders, including an “iTunes Music” folder. If that’s the case, you have almost certainly been using iTunes for a number of years, and the contents of your iTunes folder are arranged in the way that versions of iTunes prior to iTunes 9 required. iTunes 9 and later can still use the older iTunes folder organization, which is why you don’t see the iTunes Media folder.
Nonetheless, you’ll need to reorganize the iTunes folder to consolidate and to organize properly all of your media in the iTunes Media folder, should you wish to use it for your iTunes media server. (This isn’t entirely a required step; if all the copies of iTunes in your family are set up using this old version of the iTunes folder, they can all continue to use the old iTunes folder hierarchy rather than looking for everything inside a new iTunes Media folder. However, this article assumes you are using the new iTunes Media folder hierarchy.) The next section of this article discusses how to reorganize your iTunes folder properly, along with some of the possible consequences of this significant and irreversible act. Those of you who
already have properly organized iTunes Media folders can skip the following section.
Organizing the iTunes Media Folder — Although organizing your iTunes collection can be a massive undertaking as far as the amounts of material to be rearranged are concerned, there’s not much work for you to do, since iTunes does all of the heavy lifting:
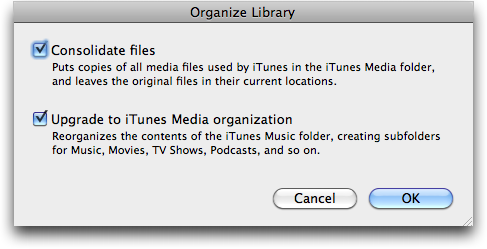
- Choose File > Library > Organize Library.
-
In the Organize Library dialog, make sure that both Consolidate Files and Upgrade to iTunes Media Organization are checked, and then click OK.
iTunes proceeds to move all of the media files in your ~/Music/iTunes folder into their proper places in the iTunes Media folder, and to copy any media files that you had stored elsewhere on your Mac but had included in your library (you did know you could do that, don’t you?) into the iTunes Media folder. Even for a media collection of 100 GB, this process usually only takes a few minutes.
There are some consequences from running this command:
- The iTunes Music folder name may not change: In some cases, your iTunes Music folder won’t be renamed to iTunes Media. Don’t worry about this; the name isn’t important. What is important is that the folder contents are arranged properly. In the rest of this article, when we refer to the iTunes Media folder, we also mean this reorganized-but-not-renamed iTunes Music folder.
-
Disk space may drop: This process can require lots of disk space if you have many large files stored elsewhere on your hard disk that are part of your iTunes media collection, because the command doesn’t move those files but instead copies them. For example, Michael has a number of large movie files stored elsewhere on his Mac, but that appear in his iTunes library. Consolidating the library would make copies of each of those movies and put them in his iTunes Media folder. If you are running short of disk space, you’ll have to free up enough space on your disk to accommodate those copies before you undertake the reorganization.
-
Time Machine space will drop: Time Machine will see the reorganized iTunes Media folder as a new folder, and will back up all its contents. You may want to prune older iTunes backups from your Time Machine drive before you undertake the reorganization if Time Machine space is running low.
See the Apple support note, “iTunes 9: Understanding iTunes Media Organization,” for more information about what will be put where.
Set Up a Shared Media Folder — Here’s the key to making your own iTunes media server: iTunes doesn’t care where the iTunes Media folder is stored or what its name is. As long as you set iTunes’ preferences (stored in ~/Library/Preferences/com.apple.itunes.plist, if you care) so that iTunes looks for the media folder where you have placed it, iTunes will use that folder. The database files – which, as we’ve said, contain things like your playlists – still remain in ~/Music/iTunes no matter where your music and other media resides. Thus, if you put the iTunes Media folder on a shared volume or on a file server on your network, several people can use it and still have their
own personal playlists and all the other information that is unique to their view of the iTunes library. (Although you can merely move or copy the iTunes Media folder manually in the Finder, Apple describes a more-involved way to move an iTunes Media folder in the support note, “iTunes for Mac: Moving your iTunes Media folder.”)
In the following scenario, we assume you have copied your iTunes Media folder to a file server on your home network and have set the folder’s permissions so that other users on the network can read from and write to that folder. One user (probably you) will be the main person who should add media to the iTunes Media folder. Think of this user as the designated Media Librarian. It’s not a major problem if other users have read and write privileges and add media, but using and maintaining the media server will be less confusing if one person does most of the work.
You may have noticed that we’ve been rather vague about the “file server on your home network” and how to set permissions on it. That is, unfortunately, intentional: we don’t know the equipment that you own and so we can’t say exactly what this device might be, nor how you should set it up. It could be an older Mac that you have sitting around that you’ve pressed into service as a file server. It could be an external USB drive attached to an AirPort Extreme base station. It could be a NAS (network-attached storage) device of some sort. All of these could work (though nothing is guaranteed: see below, “What Could Possibly Go Wrong?”), but the details of installing the server and setting the appropriate permissions on it
vary.
If, instead, you share the iTunes Media folder from your Mac, you need to make it a Shared Folder using the Info window for that folder:
- Move the iTunes Media folder to your account’s Public folder. (This isn’t absolutely necessary, but putting it there both makes it accessible to other accounts on your Mac and serves as a reminder to you that the iTunes Media folder is publicly available.)
-
Select the folder, and then choose File > Get Info.
-
Click Shared Folder in the General section of the Info window.
-
At the bottom of the Get Info window, click the lock icon to authenticate, and then give everyone Read & Write permissions. That’s necessary so users can subscribe to podcasts and other subscriptions (but this sort of data opens another can of wriggly annelids, as described below in “Podcasts and other subscriptions”).
-
From the action menu (the gear icon) at the bottom of the Info window, choose Apply To Enclosed Items, and then, in the confirmation dialog, click OK. Other users can now connect to your Public folder as Guest to see the folder and its contents.
If you’re sharing the iTunes Media folder from your Mac, there are two things to keep in mind. First, your Mac must remain on and awake, so that other users on the network can access the folder. Your Mac is a file server now. Second, you, of course, are the Media Librarian we mentioned above. Feel free to don a mask and cape.
There’s one more step before others can connect to the shared iTunes Media folder: “stamping” the media with the names of the users who will share it. Why? Because this will help identify new media later on. To “stamp” all of the types of media you want to share (that is, the music, movies, TV shows, and EPUB-based books – this step doesn’t work for PDFs or apps), select all the items with Command-A, press Command-I to display a Multiple Item Information dialog, and, in the Comments field, put the name of each person who will share the folder, separated by spaces (as in “Adam Tonya Tristan”).
Now, to use the shared folder, each user on each Mac should perform the following steps:
- In the Finder, under Shared in any Finder window sidebar, select the server that contains the iTunes Media folder. If you can’t see the server in the sidebar, use Go > Connect to Server. (If you have shared the folder from your Public folder, you can skip this step for yourself.)
-
Connect to the server, using an appropriate account. (If you have shared the folder from your Public folder, other users can connect as Guest; you won’t need to connect at all.)
-
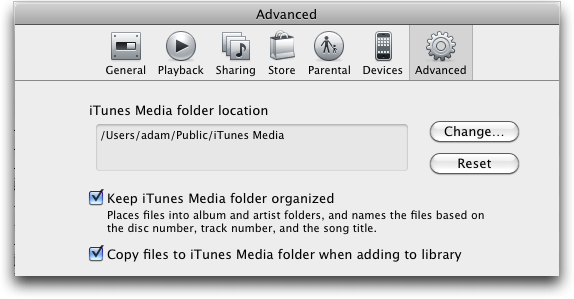
In iTunes, choose iTunes > Preferences and click Advanced.
-
To the right of the iTunes Media Folder Location panel, click the Change button, and then navigate to and choose the shared iTunes Media folder within the volume from the server you just mounted. (If you are sharing your own folder, just navigate to it on your own Mac.)
-
Select both Keep iTunes Media Folder Organized and Copy Files To iTunes Media Folder When Adding To The Library. This ensures that everything gets added to the shared iTunes Media folder.
-
In the Finder, open the shared iTunes Media folder, select all the media folders inside it that don’t contain subscription-based content (most notably, podcasts, although possibly TV shows as well), and drag them into the iTunes window to import them. This won’t import PDFs in the Books folder for some reason; they must be selected as files and dragged in separately. (If you are sharing your own iTunes Media folder, skip this step, because iTunes already knows the files are part of your iTunes [big “L”] Library.)
Note that the above steps assume each user other than the Media Librarian has an empty iTunes library. If that’s not true, and it likely won’t be, the Media Librarian will have to work with each user to gather and add the media from each user’s personal media collection for storage in the shared iTunes Media folder. Home Sharing would likely be the most effective way to see and merge multiple libraries.
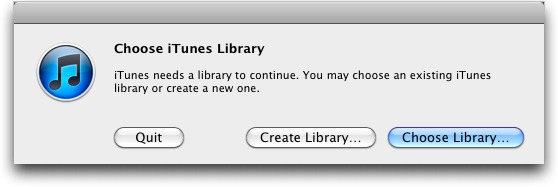
(By the way: With recent versions of iTunes, if you launch iTunes while pressing the Option key, a dialog appears that you can use either to create a new, empty iTunes Library or to switch to an existing one. This is how you’d switch back and forth between two different iTunes libraries if necessary.)
At this point each person has the shared media in his or her iTunes library. Yay! There’s one major downside to sharing an iTunes Media folder this way: every time someone adds new media – by, for instance, ripping a new CD, or purchasing something from the iTunes Store – each other user must import the files manually by dragging them into iTunes. However, that’s not true of things that you subscribe to, such as podcasts; see below, “What Could Possibly Go Wrong?” for tips.
It’s up to the Media Librarian to let everyone know when new media has been added to the shared iTunes Media folder so that other users can import it by dragging it to iTunes on their computers. This is, unfortunately, easier said than done, especially if quite a few pieces of media have been imported by the Media Librarian since the last addition.
How do you identify newly added media? You could try to match dates, but that doesn’t work well, since Date Modified can change and Date Created isn’t always representative, depending on the source of the file. There are two ways, an easy one suggested by a commenter that seems to work well, but which we haven’t had a chance to test thoroughly, and a harder one that requires some manual effort.
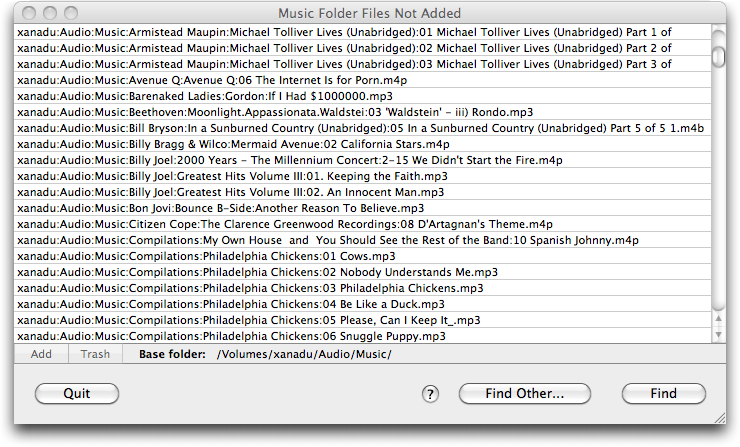
For the easy approach, download the Music Folder Files Not Added AppleScript application from Doug’s AppleScripts for iTunes. Launch it and click the Find button to look for files that exist in the iTunes Media folder that aren’t in the current iTunes Library. The first time you run it, you may discover some oddities caused by tracks that have lost their links to the associated file (just delete them from iTunes and let the utility add them back) and by duplicates (you’ll have to reconcile these manually). If this works for you, you don’t have to worry about the “stamping” step above or the alternative approach below.
If you don’t wish to use the Music Folder Files Not Added utility, or it doesn’t work for you for some reason, here’s another, harder approach (it’s why you went through the media “stamping” exercise above). Whenever anyone adds media (songs, movies, TV shows, or EPUB books; it won’t work with apps) to the shared iTunes Media folder, that person should follow these steps:
- Select all newly added items, and type Command-I to open a Multiple Item Information dialog.
-
In the Comments field, type the name of the person who has added the media. For example, typing Adam indicates that Adam’s iTunes Library file (note the large “L”) “knows” about the added media.
-
For each other Mac, open the shared iTunes Media folder in the Finder and in the Finder window’s Search field, type “comment:” followed by the name of the person who added the media, followed by a hyphen and the name of the person whose Mac it is, as in “comment:Adam -Tonya” (also, make sure to select the iTunes Media button in the Search toolbar; searching This Mac will skew the results). This search finds all items in the shared iTunes Media folder that were imported by one person, but which haven’t been added to other libraries. In this example, it would find items imported by Adam, but not yet imported by Tonya.
-
Drag any or all of the found items to the iTunes window to add them to the iTunes Library for that Mac.
-
Sort the iTunes window by either the Comments column or the Date Added column, select the newly added items, and then press Command-I to open the Multiple Item Information dialog.
-
Change the Comments field to include (don’t replace) the name of the person who has added the media; for example, changing the comments field to “Adam Tonya” indicates that these files have been added to Tonya’s iTunes Library.
Unfortunately, although the Comments metadata for each file will now contain “Adam Tonya” in this scenario, the iTunes Library of the Adam user (who imported the music to start with) won’t display that change until Adam plays a song or changes other metadata. There seems to be no way to force iTunes to refresh the metadata contained within media files.
It’s worth noting that each user of the media server can choose which of the shared media files to import, so if you don’t want your daughter’s Justin Bieber songs appearing in your iTunes Library, you can ignore them. Also, consider what this distinction between the iTunes media and the iTunes Library means for user-specific metadata like playlists, ratings, and play counts. Since iTunes tracks that information within each user’s iTunes Library file, every user will have their own metadata even though they share the media. Generally speaking, that’s good, since you probably don’t want your daughter’s playlists, nor do you want her play counts to migrate to your iTunes Library, because your smart playlists that relied on play count
might have unintended contents.
However, if you’re sharing your content among your own machines – you have a Mac in your basement office and a Mac mini that plays music through your stereo system upstairs – not having the same playlists might be annoying. In this situation, you might be better off moving your entire iTunes folder to the server and selecting it with an Option-launch of iTunes. You must also make sure that each copy of iTunes looks for the iTunes Media folder itself in the proper location. The downsides there include contention for the iTunes Library file – only one copy of iTunes could be running at any given time – and performance problems if the iTunes Library file is large.
What Could Possibly Go Wrong? — The answer to that question is “lots of stuff.” Keep in mind that over the past decade Apple has had to tap-dance faster than a caffeinated hummingbird just to make sure that iTunes and its complicated ecosystem remain compatible with all the devices and the user scenarios that Apple supports. A roll-your-own iTunes media server is not something that Apple prohibits, but neither is it something that they support.
Here are a few of the pain points that might keep you from implementing an iTunes media server and instead could send you back to the supported solutions we described in “Apple’s Sharing Solutions,” above:
- NAS issues: Network-attached storage devices are computers designed specifically to share files with other devices on a network. They typically run a stripped-down operating system, often Linux or a customized version of FreeBSD, designed to handle file-sharing tasks. From this description, you might think that such devices are a perfect place from which to share iTunes media. In theory, you are right; however, in theory, there is no difference between theory and practice, but in practice, unfortunately, there often is.
Many people have tried using NAS devices to share iTunes media, some with success, some without. Problems that we’ve heard reported include such minor inconveniences as an inability of a NAS to share album artwork to such major problems as, well, as not working at all. The reasons why they might not work are often unclear, and we’ve seen all sorts of theories, workarounds, and configuration suggestions proposed that solve problems for some users and not for others.
-
Podcasts and other subscriptions: Podcasts and other iTunes Store items to which you subscribe involve a complex interaction between your iTunes Library file, the podcast source on the Internet, and your iTunes Media folder. It’s not enough just to drop a podcast downloaded by someone else on your iTunes application: iTunes gets information from the podcast server that isn’t part of the file itself in order to keep track of which episodes you have obtained, which ones you’ve discarded, and which ones you need to get. Consequently, it does no good for the Media Librarian for your homegrown media server to subscribe to the podcasts you want and tell you about them: the podcasts still won’t appear in your podcast collection
with the necessary information you need to manage these evanescent items.In short, all users must subscribe to their favorite podcasts and TV shows rather than relying on the Media Librarian and manual copying of files. If multiple users subscribe to the same podcast, the podcast media will be downloaded more than once, but since each copy of iTunes is tracking its own downloads (the files are given unique names) there shouldn’t be any confusion.
-
Rights management: One of the reasons for sharing the iTunes Media folder instead of using Home Sharing, aside from the duplication of data, is to avoid having every user share the same iTunes Store authorization. After all, the music that the iTunes Store currently sells no longer has digital rights management restrictions, so any user on the network can play it. However, you do have to share the authorization even when using a shared iTunes Media folder if you want to play media that is still protected by Apple’s DRM system, FairPlay (such as songs purchased in the “bad old days” or for TV shows and movies purchased from the iTunes Store). And FairPlay limits the number of users sharing the same authorization to five. If
you have more than five users on your home network, some of the users won’t be able to play any FairPlay-protected media from the shared iTunes Media folder. -
iOS apps purchased on an iDevice: When you purchase an app on your iPod touch, iPhone, or iPad, it syncs back to the iTunes Media folder the next time you connect your device. That’s fine, and if other users wish to share that app (up to five), it can be added manually from the Finder to iTunes like any other piece of media. Duplicate purchases aren’t a problem, since the files are given unique names. However, if an app purchased by one person is updated by another, the second person will need the first’s iTunes Store password.
-
Road warriors: This is an obvious pitfall though not a big one. If you use a laptop and rely on a shared iTunes Media folder on a local server, you won’t have access to it when you are traveling. The best solution to this is to create a second iTunes Library on the laptop, reset the location of the iTunes Media folder in the Advanced preferences, and copy a subset of your content to it manually when you travel. Remember, you can Option-launch iTunes to create a new iTunes Library and to switch back and forth between the one that looks to the shared iTunes Media folder on your network and the one that has its content stored locally; you must also reset the location of the iTunes Media folder each time, since that is stored
in ~/Library/Preferences/com.apple.itunes.plist, not in the iTunes Library file. This approach requires you to keep track of what media you have stored where. And it also means that play counts, ratings, and playlists between the two iTunes Library files will inevitably differ. -
Birds leaving the nest: Sharing media among family members is great – until one of those members, say, grows up and goes away to college. It’s a problem similar to those that road warriors would have with a shared iTunes Media folder, but one that has to be solved only once: the departing user needs to make a new iTunes Library, reset the location of the iTunes Media folder to the local disk, and copy the media she wants into it from the shared iTunes Media folder. There still may be issues involving authorization for any protected media that gets copied, of course. And, again, playlists, play counts, and ratings won’t be copied: the departing user has to start fresh with those.
But, if none of the issues mentioned above are too troublesome, you can enjoy a shared iTunes media server right now, and not have to wait until that glorious day in the far future when Apple, and all the media companies with whom it partners, finally allow the development of a true Apple-supported iTunes Media Server. For more on what that would require, see Kirk McElhearn’s thoughts at Macworld in “Opinion: Apple needs an iTunes Server version.”
I was looking for something like this as it describes the scenario at my house. I'm the "librarian", but I want everyone else to be able to rate songs and create their own playlists.
So I decided to try it out, and changed the location of my itunes media folder to public/itunes, but nothing was moved. When I open iTunes all my music is still there, even though I changed the location to public/itunes, and when I open the public/itunes from another user there is only one iTunes created empty folder underneath. Did I miss anything in the instructions for a non-empy iTunes library ?
You still have to move your iTunes Media folder physically; there's a link to Apple's instructions for doing that, or you can just drag it from your Music folder to your Public folder. (The problem with dragging is that the next launch of iTunes will create an empty iTunes Media folder in the old location until you change that setting in Advanced. The problem with Apple's technique, I believe, is that it will duplicate everything in the second location, so you'll have to delete the original iTunes Media folder manually, which is scary. And have enough disk space.)
I have a similar setup on my system feeding four separate computers. As you noted, if one user adds content to iTunes, it won't show up for the other users until it is also added to their library. You use tags to identify which songs have been added by whom, but that is quite labor intensive and easy to forget to do or screw up. Have you tried "Music Folder Files Not Added" from Doug's Scripts:
http://dougscripts.com/466
If User A adds content, and User B periodically runs the script (actually, an app triggered by the script) then User B will get a list of everything in the iTunes media folder that is not in User B's iTunes library. There is even a button to add those items to User B's library.
Cool! I hadn't heard of that script, but it sounds perfect. I'll add a note to the article.
I just use Sonzea software's Syncopation app to keep my iTunes libraries in sync across all of my Macs. Sure, it means my media is duplicated on each Mac (rather than living in one centralized location) but I have large hard drives and consider this a plus (my media is backed up multiple times). http://www.sonzea.com/syncopation/
In my case, the problem was slightly different and more family focused.
I needed a solution in which both my children and wife could manage their iPhones/iPods from the same computer without duplicating the media library.
I have a generic account (iTunes) from which all media is managed and that worked well enough until recently. Now, they all have their own account on the family iMac, so I settled for a common library solution.
I symlinked the iTunes folder of each user to the common one (the generic account) making sure that the ACLs would enable every user to add/delete media in the media library.
This works well if you are ready to (1) share everything (playlists, apps, music, etc.) and (2) give up on the fast user switching feature of Mac OS X (having the same library opened twice would really screw this up for good).
On the other hand, each user benefits from new tracks (purchased or ripped) without having to do anything as they are using/accessing the same files.
I'm pretty sure from my testing that you can still use Fast User Switching just fine; iTunes will simply refuse to launch if another copy of iTunes is accessing the shared iTunes folder and the single iTunes Library file.
While I appreciate the effort that went into writing this very thorough article, much of the hassle described here is obviated by the fact that you are wrong about Home Sharing. You absolutely can play files directly off the "Master" without having to copy them to the local machine.
So for us, we simply have one "family" machine in the kitchen that serves as the master iTunes collection. That's the machine we use to rip CDs or import files or subscribe to podcasts. Then each other machine just used home sharing to access that one, never copying any files over. It does have limitations, but it accomplishes what you describe here with much less hassle.
Even though we have more than five devices, it's not a problem. When I run out of authorizations, I just de-authorize all and start over. I've never needed to use all seven devices all at once. And screen sharing means you can manage the "Master" from anywhere.
Well, you can play music from the Master, but that's no different than the old iTunes Sharing in the Preferences. The key limitations is that it's read-only; you can't make (or even add to) playlists, maintain your own play counts or ratings, and so on.
I also presume, though I haven't tested this, that iOS devices wouldn't be able to sync any of the Home Shared media without first copying it locally.
There are many other frustrations with sharing music this way. As another example, Apple's remote software can be painfully slow when dealing with a 'Home Sharing' setup, especially dealing with album art in a large library. Many of the issues that arise because of the limited sharing options available won't affect most people, but there's plenty of little annoyances that it causes for many of us!
This is great for music files, but what about iPhoto? My wife is constantly accessing my iMac for photos that she does not have on her iMac. Is there a way to have a photo server for the home?
There's no way to have a photo server as with iTunes, since iPhoto doesn't allow you to change the location of where photos are stored en masse.
What you can do is copy an iPhoto Library package (it's really a folder) to a server, and then launch iPhoto by double-clicking that folder (this requires at least iPhoto '09; with previous versions of iPhoto, or if you want to be able to click iPhoto in the Dock to launch it, first Option-launch iPhoto and choose the iPhoto Library package on the server.
Note that you must have a fast network for this to be at all functional, and only one person can use the shared iPhoto Library at a time.
Thanks for taking what must have been a huge amount of time to put this together. I have done most of what you suggested here (minus a few steps here and there to better suit my system/setup) and have things working nicely.
I think you might really appreciate this little gem of software: http://www.mediarover.com/ Free and well worth a look - it's capable of more than what it seems on the surface and apparently has a number of features soon to be added. I think Mediarover and your tutorial combined have the power to save us all from the torment we have been suffering at the hands of Library (or is that library?) management! Would love to hear your thoughts!
Hmm, Media Rover does look pretty interesting, although I'm curious how it works with things like podcast subscriptions and iOS apps, which wasn't immediately evident from their site.
But definitely something we'll check out more...
[2015 note: The Mediarover site seems to have been taken over by scammers; don't visit it.]
Downside seems to be lack of support. I've read almost all topics within their forum and most are left unanswered (or replied to once without solution). My understanding is that podcast subscriptions, movies, apps etc are not within the scope of mediarover, it's music only for now.
Just to follow up, about an hour after my last comment, almost every thread had been answered. With a little added functionality (promised for the new year) I think Media Rover could be excellent.